If you want to make a picture look more professional and visually appealing, you can remove the background using Word. Whether you want to highlight a specific part of the image or create a cleaner layout, its built-in tools make it easy.
In this guide, we will walk you through the simple steps on how to remove the background of a picture in Word. It would not only help you to remove watermarks or backgrounds from the pictures with minimal effort but also make them attractive and visually appealing.
What are the Benefits of Removing Background of Pictures in Word?
Removing the background of pictures in Word is beneficial in various scenarios, such as creating professional documents, presentations, or marketing materials. Whether you’re preparing a report, a flyer, or a slideshow, tools in Word remove BG and make your content more engaging and focused.
Apart from this, you can enjoy the following benefits by using the Word to remove the background picture:
- It helps you to highlight specific parts of the image by removing the background of a picture.
- By using Word to remove the background of a picture, you can make the documents cleaner and more polished, giving them a more professional look.
- Using it, you can not only remove the background but also integrate images into various backgrounds for styling.
- You can also use the edited images in multiple projects which makes it versatile in its usage.
How to Remove a Picture Background in Word on Windows
Removing the background from a picture in Word is a pretty simple task that can boost the visual appeal of your pictures or other documents. In addition, you can emphasize a specific part of an image or give it a neat look.
However, if you are new to the use of the Word and don’t know how to make pictures transparent on a Word by removing their background, then follow the below-listed steps:
Step 1: Insert the Image
Open your Word document and insert the image you want to edit by clicking on the “Insert” tab, selecting “Pictures”, and choosing your image from your files.

Step 2: Select the Image
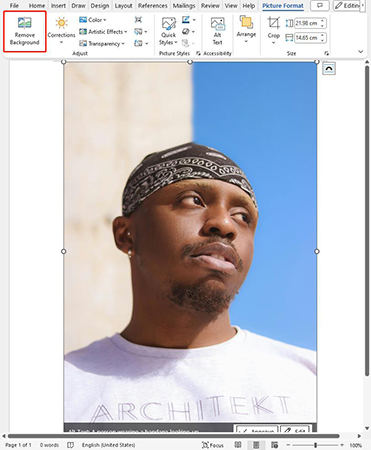
Now click on the image you inserted in the previous step to select it. This will bring up the “picture format” tab in the toolbar. Follow the next step to learn what to do next.
Step 3: Remove the Background
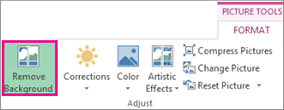
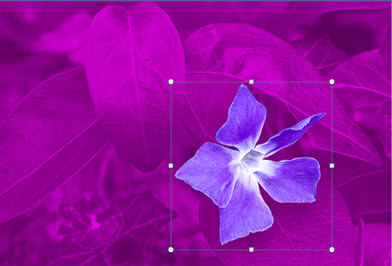
In the “Picture Format” tab, click on the “Remove Background” button found in the “Adjust” group. Word will automatically highlight the background areas to be removed in magenta.
Step 4: Adjusting the Selection
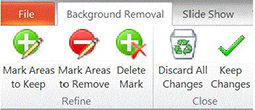
Now, you can fine-tune the selection by using the “Mark Areas to Keep” and “Mark Areas to Remove” options in the “Background Removal” tab to ensure the correct areas are kept or removed.

Step 5: Apply Changes
Once you’re happy with the selection, click “Keep Changes”. The background will be removed, leaving you with a clean, transparent image ready for use in your document.
How to Remove a Picture Background in Word on Mac
Removing a picture background in Word on a Mac is an easy way to make your documents look more polished and professional. Here are the steps on how to remove background in Microsoft Word on a Mac, the steps are very similar to the steps on Windows:
Open your Word document and insert the image you want to edit. Click on the “Insert” tab, select “Pictures”, and choose the image from your files.
Click on the inserted image to select it. This action will reveal the “Picture Format” tab in the toolbar.
In the “Picture Format” tab, click on the “Remove Background” button. Word will automatically detect and highlight the background areas to be removed in magenta.
![remove background in word on mac]()
You can fine-tune the areas you want to keep or remove using the “Mark Areas to Keep” and “Mark Areas to Remove” options in the “Background Removal” tab.
Once you are satisfied with the selection, click “Keep Changes”. The background will be removed, leaving you with a transparent image ready to enhance your document.
How to Remove Background in Older Versions of Microsoft Word
If you are using older versions of Microsoft Word, like the ones from 2013 to 2016, don’t worry; removing the background of a picture in them is also pretty simple. Following are the steps on how to delete background in Word:
The first step is to insert the image that you want to edit. You can do this by clicking the insert tab and then “pictures” to upload images from your computer’s folder.
Now, you have to select the image. Many times, the “picture format” tab is not visible to people in older versions of Word. It happens mostly because they don’t select the pictures. Thus, make sure that the picture is selected.
Like the newer version, the older versions follow the same procedure for removing the backgrounds: select the picture tools under the format tab in the adjusted group and click “remove background”.
![remove background in word older office version]()
In an older version of Microsoft Word, you can simply click one of the handles in the marquee lines and then drag the line, which will then contain the portion you wish to keep and exclude the background you want to remove.
![adjust remove background in word older office version]()
If the manual selection is not working out for you, you can simply select the “Mark Areas to Keep” or “Mark Areas to Remove” and use a drawing pencil to mark them accordingly. Once you are done with the background removal, you can right-click the image and select “save as picture”.
![adjust remove background in word older office version]()
Bonus Tip: Instantly Remove Background of Pictures in 1-Click
If you often need to remove the background from pictures and are looking for a quicker solution, then consider using FliFlik KleanOut for Photo. This tool can instantly remove backgrounds from multiple images with just one click, making it a great choice for those who need to process images in bulk efficiently.

Features
- Instantly removes the background of multiple pictures in a batch with a single click
- It is able to detect and remove backgrounds with advanced AI
- It is easy to navigate, and every feature is just a one click-away
- It supports multiple file formats like JPEG, PNG, and even BMP
If you want to remove the background of multiple pictures with just one click in this FliFlik Background Remover, follow the steps below:
Install and launch KleanOut for Photo on your computer and choose the “Remove Background from Image” option.
FREE DOWNLOADSecure Download
FREE DOWNLOADSecure Download
Import one or multiple pictures to the program. FliFlik automatically creates your product/portrait picture with a transparent background. If you want to make further changes, you can use other tools like “eraser” and to instantly remove the background.
![make transparent background]()
After you are done with removing the background of the pictures, click on “Export” or “Export All” to export all the batches at once, which saves you time and effort.
![export image with transparent background]()
Conclusion
We hope you are now well versed on how to remove background of a picture in Word. It is a pretty straightforward process and provides an appealing and cleaner look to your pictures or documents.
Additionally, for those seeking a faster solution, FliFlik KleanOut for Photo offers a convenient one-click option, perfect for batch processing and ensuring accuracy in background removal. Simplify your editing process today and make your documents shine with clarity and professionalism.

