Inkscape can be an invaluable tool for graphic designers, especially when it comes to removing backgrounds from images. Whether you’re preparing graphics for professional use or personal projects, mastering the ability to Inkscape remove background will enhance the quality of your designs. This guide provides the latest methods and techniques for 2026, ensuring you have the most up-to-date information. So, follow our step-by-step instructions to efficiently remove backgrounds and achieve clean, professional-looking results in Inkscape.
What are the Benefits of Removing Background of Pictures in Inkscape?
Removing the background of pictures in Inkscape offers several significant benefits:
Enhanced Visual Appeal: By using Inkscape delete background, you can create cleaner and more professional-looking images that focus on the main subject without distractions.
Versatility in Design: Background removal allows for easy integration of images into various designs, such as logos, advertisements, and presentations, without clashing backgrounds.
Improved Editing Capabilities: With the background removed, you can more easily manipulate and edit the image, adjusting elements as needed without interference.
Reduced File Size: Eliminating unnecessary background elements can lead to smaller file sizes, making images easier to store, share, and load on websites.
Consistent Branding: For businesses, maintaining a consistent look across marketing materials is crucial. Background removal helps in achieving a uniform appearance, aligning with brand guidelines.
How to Remove Background in Inkscape
Removing the background from an image can significantly enhance the quality and versatility of your graphic designs. Here’s a detailed guide on how to remove background from image in Inkscape. Follow these five steps to achieve a clean and professional look.

Step 1: Import the target image into Inkscape. Navigate to the Path menu and select the Bezier Tool. Outline the subject you want to keep to separate it from the background
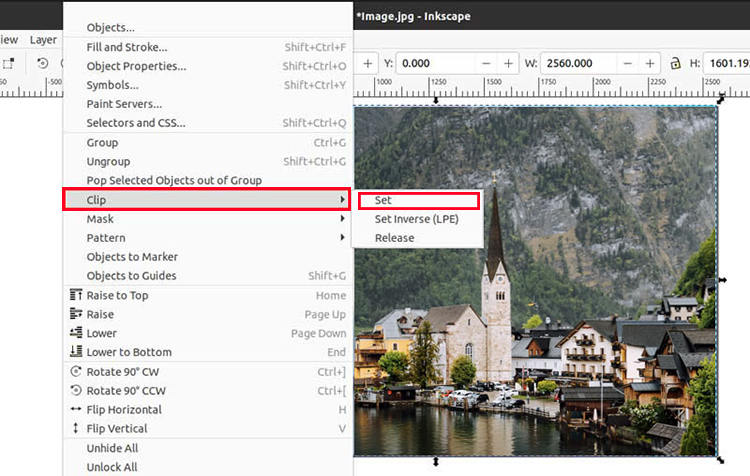
Step 2: Select the “Select and Transform” tool. Hold the Shift key on your keyboard and select Object > Clip > Set to remove the background.
Step 3: Once you are happy with the results, save the transparent image by exporting it in PNG format.
How to Remove White Background in Inkscape
You can now easily remove the white background in Inkscape by following these simple steps. Here’s how to efficiently remove white background Inkscape:

Step 1: Import the target image using the Import option in the File menu. Go to the Path menu and select Trace Bitmap. In the Trace Bitmap panel, click the Single Scan button. Then, pull down the dropdown list and choose Brightness cutoff. Click the Update button to see the image in a black and white color scale.
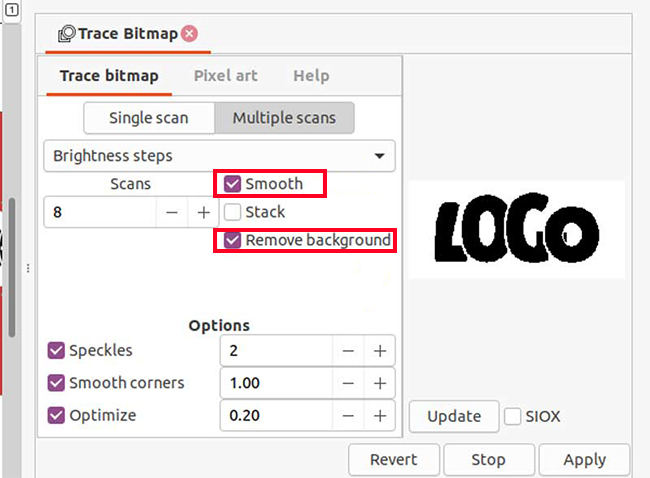
Step 2: Next, click the Multiple Scans button. Check the boxes next to Smooth and Remove background. Click the Update button, then Apply. Left-click on the main object, and choose Delete to get rid of the background. This will effectively remove white background Inkscape and leave you with a clean image.
Best Alternative to Bulk Remove Image Background Easier
Sometimes you also need some other tool as KleanOut might not be the perfect fit for all background removal tasks. One such alternative is KleanOut for Photo, an excellent solution for bulk image background removal.

This tool is designed to handle large volumes of images efficiently, saving you time and effort. With its advanced AI capabilities, KleanOut for Photo ensures precise background removal, making it an ideal choice for professional and personal projects. Here are some of the features along with a step wise guide of the tool:
Features
- Easily remove watermarks from multiple images at once.
- Effortlessly eliminate signatures from photos for a cleaner look.
- Strip away logos from images in just a few clicks.
- Utilize advanced AI to quickly remove watermarks with precision.
To remove background from image instantly with KleanOut for Photo:
Launch KleanOut for Photo on your PC and select “Remove Background from Image”. Click or drag the images from which you want to remove the background.
FREE DOWNLOADSecure Download
FREE DOWNLOADSecure Download
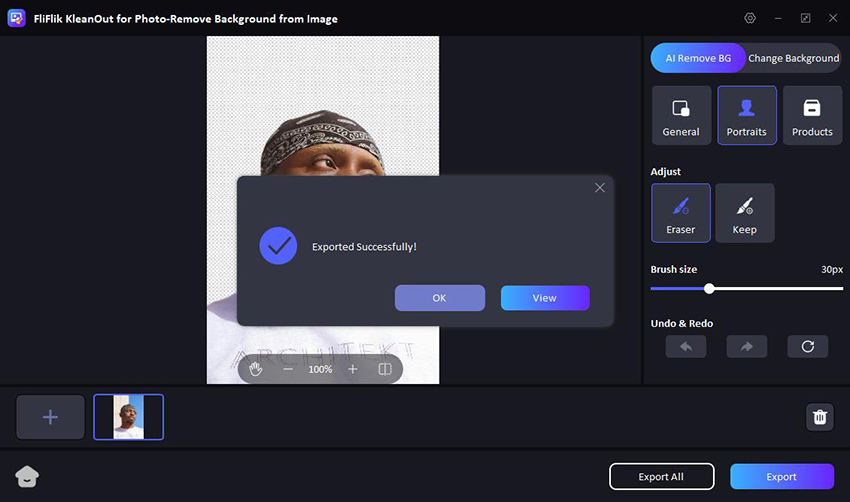
KleanOut will automatically create a transparent background for your product or portrait picture. Use KleanOut’s tools to further refine the image, easily erasing or retaining parts of the removal to suit your needs.
![make transparent background]()
Once you are happy with the results, click “Export” to save the transparent images.
![export image with transparent background]()
Conclusion
Mastering the ability to Inkscape remove background can greatly enhance your design projects by providing cleaner, more professional images. While Inkscape is a powerful tool, for bulk background removal tasks, KleanOut for Photo is highly recommended. Its advanced AI capabilities and user-friendly interface make it an ideal alternative for efficiently handling large volumes of images.


