Do you know how to check dpi of image and why it’s crucial for your digital projects? DPI, or dots per inch, measures the resolution of an image, directly influencing its clarity and quality, especially in print. Whether you’re a photographer, designer, or just looking to improve a family photo, understanding and adjusting the DPI can significantly enhance your results. This guide will walk you through the steps to find and increase an image’s DPI on both Windows and Mac computers, ensuring your images always look their best.
What is DPI of Image?
DPI, or dots per inch, is a measure of spatial printing or video dot density. It refers to the number of individual dots that a device can create within a linear inch. In images, a higher DPI translates to a denser dot pattern, which generally leads to sharper and clearer images. For printing purposes, a higher DPI is essential for achieving fine detail and vibrant colors, while digital displays rely on DPI to render images with clarity and precision.
How to Check DPI of Image on Computer
When preparing images for printing or ensuring optimal display quality, it’s essential to view dpi of image. DPI, which stands for dots per inch, determines how densely these dots are packed together, affecting the image’s resolution and clarity. On computers, checking the DPI can be straightforward but varies slightly between operating systems. This section will show you how to quickly find the DPI of any image on your computer.
1: By Checking Properties [Windows]
To view the DPI of an image on a Windows computer, the simplest method is through the image file’s properties. This approach does not require any additional software and can be done quickly.

Here’s how you can check the DPI using the properties:
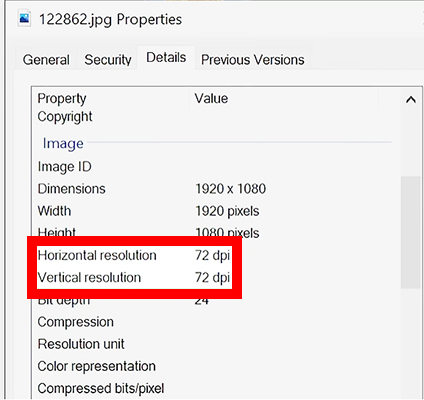
- Right-click on the image file, then select Properties from the context menu.
- Navigate to the Details tab where you will find information about the image, including its dimensions and DPI under the “Image” section.
- If the DPI information is not immediately visible, it may be listed as “Horizontal Resolution” and “Vertical Resolution”, typically measured in dots per inch.
2: By Using File Explorer [Windows]
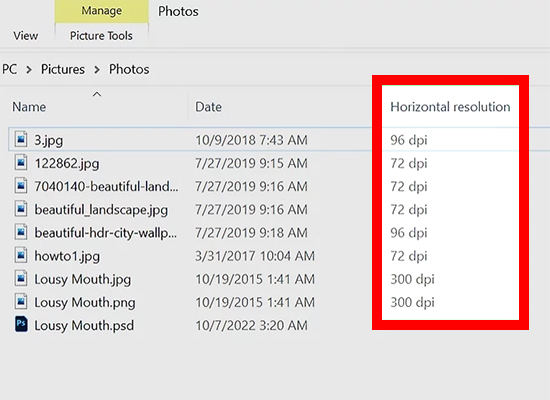
Windows File Explorer offers a convenient way to view the DPI of image files directly within the file management interface, allowing for quick checks without opening each file. By customizing the display settings in File Explorer, users can add columns that show detailed image properties, including DPI. This method is particularly useful for users who need to check the DPI of multiple images simultaneously. It provides a seamless workflow for photographers, designers, and anyone working extensively with images.

Here’s how to configure File Explorer to show DPI information:
- Open File Explorer, navigate to the folder containing your images, and switch to the Details view mode.
- Right-click on the column header, select More…, and then scroll down to find and check the Horizontal resolution and Vertical resolution options, which will display the DPI for each image.
3: By Using Microsoft Paint [Windows]
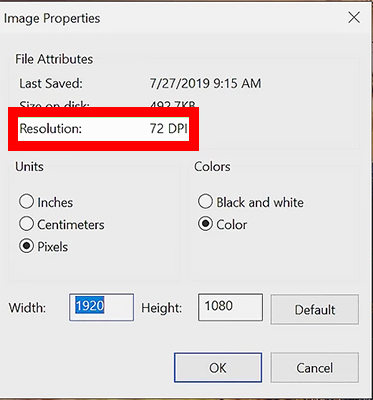
Microsoft Paint, a staple application in Windows, can also function as a dpi image checker, allowing users to view the DPI of their images. Although Paint is often seen as a basic tool, it provides essential details about image properties, including DPI, which is crucial for ensuring the correct output quality for printing or digital display. This method is especially useful for those who do not have access to more advanced graphic software. Paint displays the DPI information clearly, making it accessible even for users with minimal technical knowledge.

Here’s how you can use Microsoft Paint to check an image’s DPI:
- Open Microsoft Paint, then open the image file you want to check by clicking File > Open and selecting your image.
- Once the image is open, click on File again, then go to Properties; here, you will find the image’s attributes, including its dimensions and DPI.
- The DPI details are usually displayed under the Units section, where both the horizontal and vertical resolutions are shown.
4: By Checking Preview [Mac]
On a Mac, the Preview app is a versatile tool that not only allows you to view images and PDFs but also to check detailed properties such as DPI. This capability is particularly beneficial for graphic designers and photographers who need to ensure their images meet specific resolution requirements for print or digital use. Preview is straightforward to use and provides a wealth of information about file attributes without needing additional software. The app’s interface makes it easy to access these details, helping users to make informed decisions about image quality and modifications.

Here’s how to use Preview to check the DPI of an image:
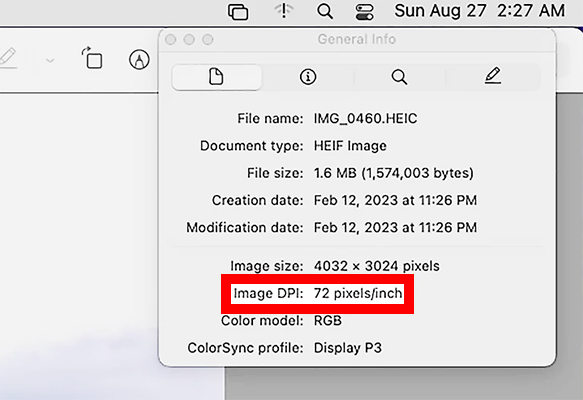
- Open your image in Preview by right-clicking the file, selecting Open With, and then choosing Preview.
- Once the image is open, click on Tools in the menu bar, then select Show Inspector.
- In the Inspector window, click on the i tab and then the General tab to view the image’s dimensions and DPI.
Extra Tip: How to Increase the DPI of Images Easily
When working with digital images, increasing their DPI (dots per inch) is essential for achieving higher quality and resolution, especially for professional printing or detailed digital display. To simplify this process, consider using tools like KlearMax for Photo, which offers powerful, user-friendly features to enhance image resolution effortlessly.

This specialized software leverages advanced technology to improve image clarity and detail, making it an indispensable tool for photographers, designers, and anyone looking to enhance image quality.
Features
- Automatically remove unwanted elements from your photos, enhancing composition and focus.
- Try before you buy to see the benefits for yourself without any initial investment.
- Boost the resolution and overall quality of your images with sophisticated enhancement tools.
- Rely on quick processing times without sacrificing accuracy or detail.
Here’s how to use it properly:
-
Download and install KlearMax for Photo on your computer.
FREE DOWNLOADSecure Download
Coming SoonSecure Download
-
Import the photos you wish to enhance and use the enhancement tools to increase the DPI and improve image quality.
![KlearMax AI Models]()
-
Edit the photo to to fine-tune the enhancement. Once satisfied with the results, click on the “Export” button to save the enhanced photo in your preferred format.
![Export the Images]()
Conclusion
Understanding how to check dpi of image is crucial for anyone working with digital media, ensuring optimal clarity and detail. For those looking to elevate image quality, KlearMax for Photo provides powerful tools to increase DPI, remove unwanted elements, and enhance images efficiently. Highly recommended for seamless improvements in image resolution and overall quality.
Coming Soon


