Enhancing photos is a crucial part of photo editing, whether you’re improving old, low-quality images, fixing low-resolution pictures, or sharpening blurry photos. Luckily, Adobe Photoshop offers numerous tools and techniques to help you achieve professional-quality results. In this guide, we will walk you through how to enhance a photo in Photoshop, covering various common problems photographers and designers encounter. By the end of this article, you’ll also discover how AI-based tools like FliFlik KlearMax for Photo can speed up the process for quick, one-click enhancements.
How to Enhance a Low Quality Photo in Photoshop
Low-quality photos can result from various factors, such as poor lighting, noise, or improper camera settings. Photoshop provides several methods to enhance these images, restoring their clarity and vibrancy. Here’s a step-by-step guide on how to enhance a low-quality photo in Photoshop:
-
Open the Photo in Photoshop: Launch Photoshop and load the low-quality image by going to File > Open. This will bring the image into your workspace.
-
Duplicate the Layer: To ensure non-destructive editing, duplicate the background layer by right-clicking it in the Layers panel and selecting Duplicate Layer. Rename this new layer if needed.
-
Adjust Brightness and Contrast: Navigate to Image > Adjustments > Brightness/Contrast. Use the sliders to increase the brightness and contrast of the photo. This step helps bring out hidden details, making the image clearer.
-
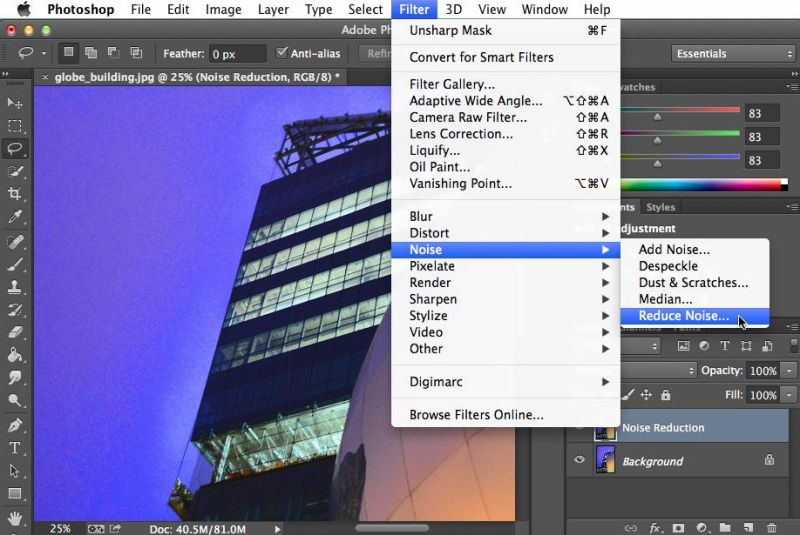
Reduce Noise: If the image has a lot of grain or noise, go to Filter > Noise > Reduce Noise. In the pop-up dialog box, adjust the sliders for Strength, Preserve Details, Reduce Color Noise, and Sharpen Details. Start with small adjustments and preview the results before applying.
![Ps Filter Noise]()
-
Sharpen the Image: For added clarity, use the Smart Sharpen filter by going to Filter > Sharpen > Smart Sharpen. In the settings, adjust the Amount and Radius sliders to make edges more defined. Use the Reduce Noise slider here too for better control over noise reduction.
-
Use the Dodge and Burn Tools: The Dodge tool lightens specific areas of the image, while the Burn tool darkens areas. Select the tool from the toolbar, adjust the brush size, and lightly apply it to specific areas to enhance highlights or shadows.
-
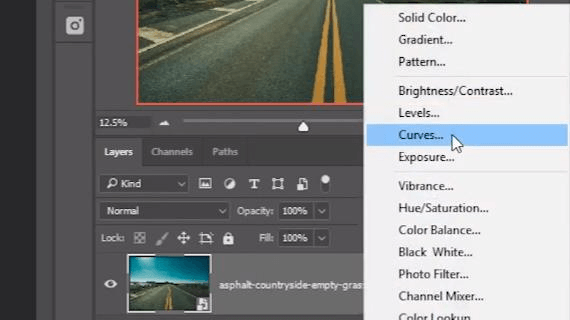
Color Correction: For final color adjustments, use Image > Adjustments > Levels or Curves to fine-tune the photo’s tonal range. This step allows you to balance exposure, contrast, and brightness effectively.
![PS Adjustment Curve]()
-
Save the Enhanced Photo: Once you’re satisfied with the enhancements, save the image in your desired format by going to File > Save As.
How to Enhance a Low-Resolution Photo in Photoshop
Working with low-resolution photos can be challenging, especially if you need to upscale the image without losing detail. Photoshop has several tools that can help increase the resolution of a photo while preserving quality. Here’s how to enhance a low-resolution photo:
-
Open the Photo in Photoshop: Begin by opening the low-resolution image by selecting File > Open.
-
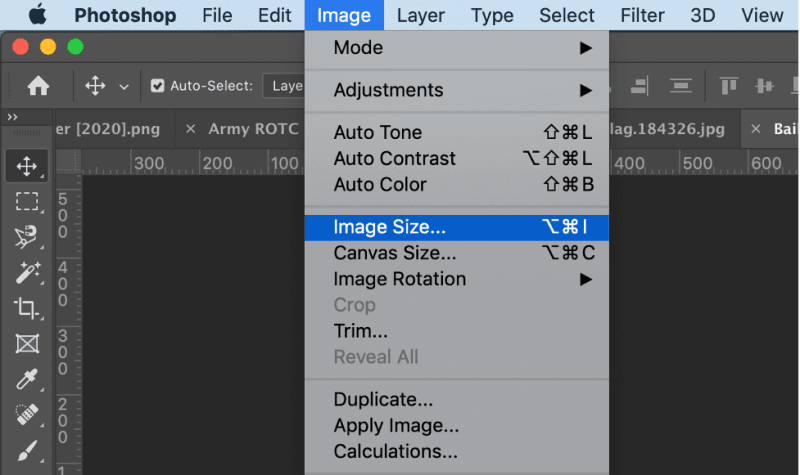
Change image size: Go to Image > Image Size. In the dialog box, ensure that Resample is checked. Choose Preserve Details 2.0 from the dropdown under Resample as it provides the best results for enlarging images.
![PS Image Size]()
-
Adjust resolution: Increase the resolution by entering a higher value (e.g., 300 pixels per inch for printing purposes). Then, increase the dimensions of the image to your desired size. Watch the preview to see how the changes will affect the image.
-
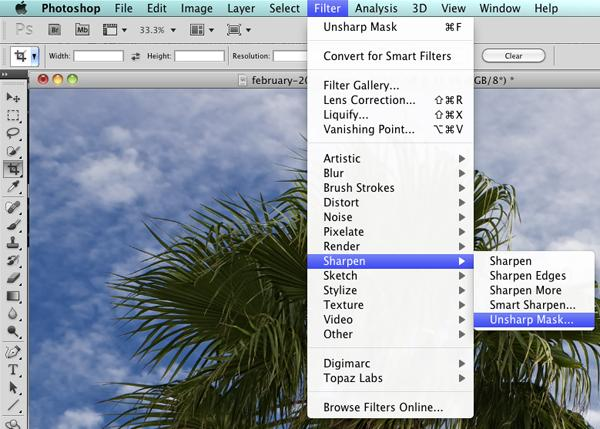
Apply sharpening: After resizing, use Filter > Sharpen > Smart Sharpen to regain some of the details that might have been lost during the upscaling process. Adjust the Amount and Radius to enhance the image’s clarity.
![PS Filter Sharpen]()
-
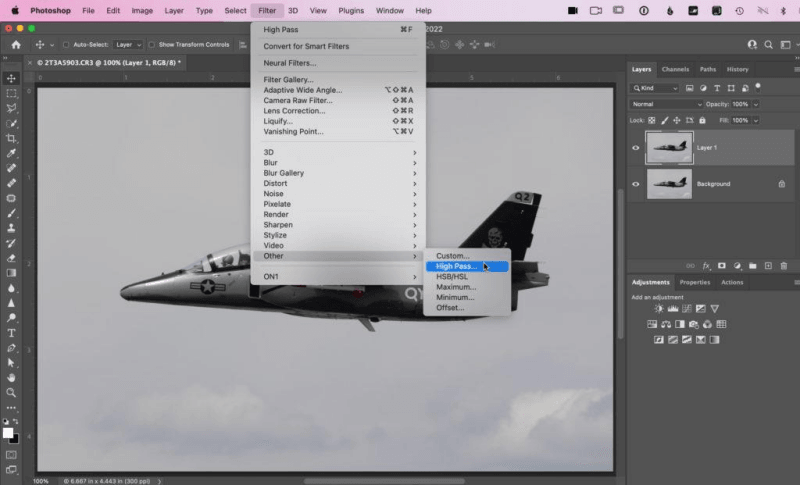
Add texture using high pass filter: To improve detail without introducing excessive noise, create a new duplicate layer and set its blending mode to Overlay. Then, go to Filter > Other > High Pass. Use a small radius (around 1-2 pixels) to add subtle sharpening and texture to the image.
-
Use content-aware fill: If certain parts of the photo look stretched or distorted, use the Content-Aware Fill tool. Select the problematic area with the Lasso Tool, then go to Edit > Fill and choose Content-Aware.
-
Save the Enhanced Photo: Save the enhanced high-resolution image by going to File > Save As.
How to Enhance Blurry Image in Photoshop
Blurry images can result from various factors such as motion blur, camera shake, or improper focus settings during the capture process. These issues can ruin an otherwise great photo, making it look unprofessional or unusable. Fortunately, Photoshop offers powerful tools and techniques to help reduce blurriness, recover lost details, and sharpen the image, giving it a crisper, clearer appearance. Whether the blur is minor or more severe, Photoshop’s advanced features can effectively restore clarity to your photos. Here’s a step-by-step guide on how to fix a blurry image:
-
Open the blurry image: Start by opening the blurry image in Photoshop (File > Open).
-
Convert to smart object: Convert the layer to a Smart Object by right-clicking the layer and selecting Convert to Smart Object. This allows you to apply filters non-destructively.
-
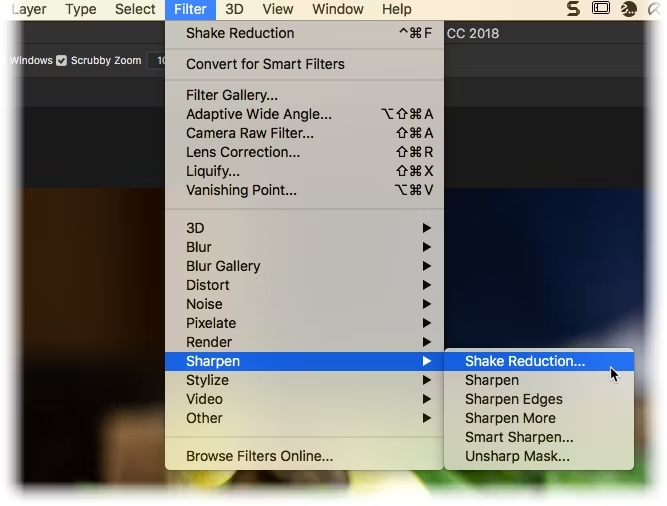
Use shake reduction filter: Navigate to Filter > Sharpen > Shake Reduction. Photoshop will analyze the blur and apply automatic adjustments. Use the Detail Magnifier in the Shake Reduction panel to fine-tune the results in different areas of the photo.
![PS Filter Sharpen Shake]()
-
Adjust the smart sharpen filter: To further enhance sharpness, apply the Smart Sharpen filter (Filter > Sharpen > Smart Sharpen). Increase the Amount and adjust the Radius to bring out finer details.
-
Refine with high pass filter: Duplicate the layer, go to Filter > Other > High Pass, and set the Radius to around 1-3 pixels. Change the blending mode of the layer to Overlay or Soft Light. This helps improve overall sharpness without introducing too much noise.
![PS Filter Highpass]()
-
Use the blur gallery: For more control, go to Filter > Blur Gallery > Path Blur or Spin Blur. These tools allow you to selectively control areas where the blur is strongest, helping refine the overall image.
-
Final color and contrast adjustments: Adjust Brightness/Contrast, Curves, or Levels to bring out the best in the image’s color and detail.
-
Save the Enhanced Photo: Save the enhanced high-resolution image by going to File > Save As.
One Click to Enhance a Photo with AI Photo Enhancer
If you’re looking for a faster, more automated way to enhance photos, AI-powered tools like FliFlik KlearMax for Photo provide an excellent solution, and leveraging advanced machine learning algorithms to improve image quality with just one click, removing noise, sharpening details, and upscaling resolution in a matter of seconds. This tool is perfect for those who want high-quality results without the need for manual adjustments or Photoshop expertise. With AI-driven precision, it is ideal for enhancing images for personal use, professional projects, or social media. Here’s how to use KlearMax for Photo to enhance a photo:
-
Go to the official website and download the software. Then, launch the app and upload your low-quality, low-resolution, or blurry photo.
FREE DOWNLOAD
Secure Download
Coming Soon
Secure Download -
The AI will automatically detect the type of enhancement needed, whether it’s noise reduction, sharpening, or resolution upscaling.
-
Simply press the Enhance Now button. The AI will process the image, applying the necessary adjustments within seconds.
![KlearMax for Photo AI Models]()
-
Once the enhancement is complete, preview the improved photo. If satisfied with the result, click the Export button to save the high-quality, enhanced version.
![Export the Images]()
Conclusion
Enhancing a photo in Photoshop is a versatile process, allowing you to fix low-quality, low-resolution, and blurry images. By using various tools like Smart Sharpen, Reduce Noise, and the High Pass filter, you can make significant improvements to your images. Additionally, for those seeking a more efficient solution, AI-powered tools like FliFlik KlearMax for Photo offer a fast, one-click option to automatically enhance images. Whether you prefer manual adjustments or AI-driven enhancements, this guide has covered essential techniques on how to enhance a photo in Photoshop, ensuring your images look professional and polished.
FREE DOWNLOAD
Secure Download
Coming Soon
Secure Download
