Sometimes you may need to invert the colors of a picture for creative effects, accessibility purposes, or simply for fun. Inverting a picture can produce striking visual contrasts, turning light areas dark and dark areas light. This process is useful in graphic design, presentations, or personal projects. Whether you’re using advanced software like Photoshop or just everyday tools like Microsoft Word or PowerPoint, learning how to invert a picture is straightforward. In this article, we’ll explore four easy methods to invert a picture in Photoshop, Word, PowerPoint, and on an iPhone. Additionally, we’ll look at how AI can help you colorize black-and-white photos.
How to Invert a Picture in Photoshop
Photoshop is one of the most powerful image editing tools, and inverting a picture in this software is quick and efficient. Below are the simple steps to invert a picture in Photoshop:
-
Open Photoshop: Launch Photoshop on your computer and open the picture you want to invert by going to File > Open and selecting the image.
-
Duplicate the Layer: Before inverting, it’s a good idea to duplicate the image layer so that you can work non-destructively. Right-click the image layer in the Layers panel and select Duplicate Layer. You can also press Ctrl + J (Windows) or Cmd + J (Mac) to quickly duplicate the layer.
-
Invert the Image: With the duplicate layer selected, go to the top menu and choose Image > Adjustments > Invert. Alternatively, you can use the keyboard shortcut Ctrl + I (Windows) or Cmd + I (Mac).
![PS Invert Image]()
-
View the Inverted Image: You should now see that all the colors in the picture have been inverted. Light areas will appear dark, and dark areas will appear light. The color scheme will be completely reversed.
-
Save Your Image: Once you’re satisfied with the inverted image, go to File > Save As to save it as a new file. Choose your preferred format (e.g., JPEG, PNG) and save the image to your desired location.
This method provides a high degree of control, making it ideal for professional designers and photographers who want precision in their edits.
How to Invert a Picture in Word
Microsoft Word is primarily a text-based software, but it does allow basic image editing, including the option to invert images. Here’s how to invert a picture in Word:
-
Open Word: Launch Microsoft Word and open a blank document or an existing file where you want to insert and invert a picture.
-
Insert the Picture: Go to the Insert tab at the top of the screen and click Pictures. Select the image you want to invert from your computer.
![Insert Picture in Word]()
-
Select the Image: Click on the image to highlight it. This will bring up the Picture Tools tab at the top of the window.
-
Open the Format Picture Pane: Right-click the image and select Format Picture. Alternatively, you can click the Format tab that appears once the picture is selected.
![Select Format Picture Pane]()
-
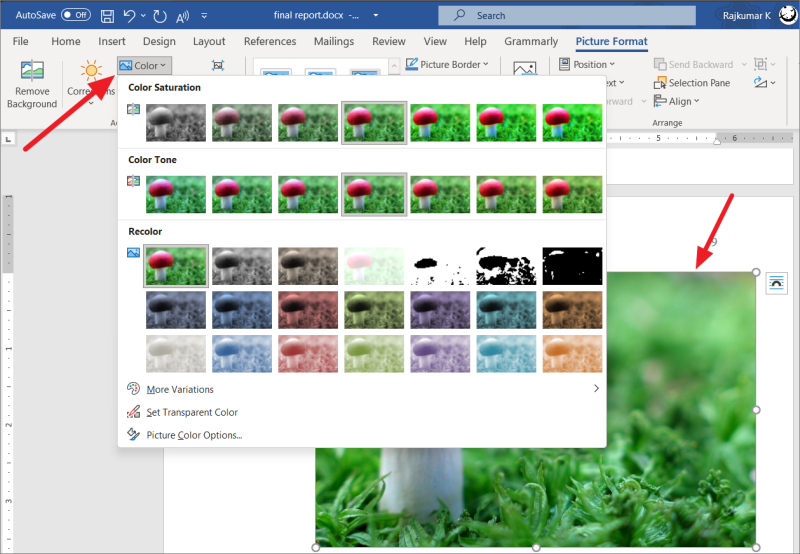
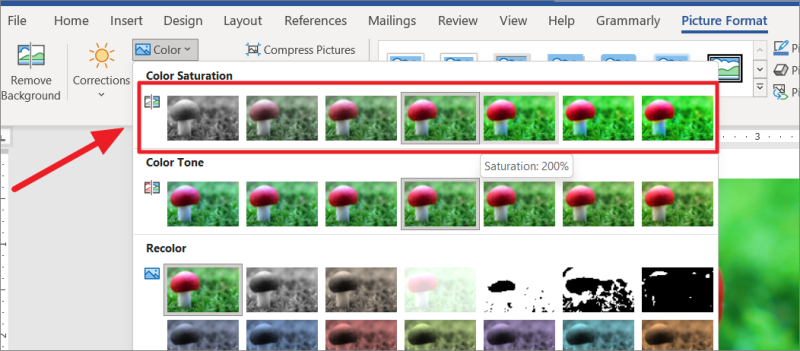
Adjust Picture Effects: In the Format Picture pane, go to the Picture Corrections or Picture Color section, depending on your version of Word. From here, you can adjust the Brightness and Contrast settings. While Word does not have a direct “Invert” button, by dragging the sliders to extreme values (Brightness to -100% and Contrast to 100%), you can create an inverted-like effect.
![Select Invert Color in Word]()
-
Save or Export the File: Once you’re satisfied with the inverted picture, you can save the Word document or export the image by right-clicking the image and selecting Save as Picture.
This method is less precise than using Photoshop but works well for quick edits within a document.
How to Invert a Picture in PowerPoint
Similar to Word, PowerPoint offers basic image editing capabilities, including the ability to invert colors. This is particularly useful for creating visually appealing presentations. Here’s how to do it:
-
Open PowerPoint: Launch Microsoft PowerPoint and open the presentation where you want to add the inverted image.
-
Insert the Picture: Navigate to the Insert tab, click on Pictures, and choose the image you want to invert from your device.
-
Select the Image: Click on the image in your PowerPoint slide to bring up the Picture Tools tab in the ribbon.
-
Open the Format Picture Options: Right-click the image and select Format Picture, or click the Format tab in the toolbar when the image is selected.
-
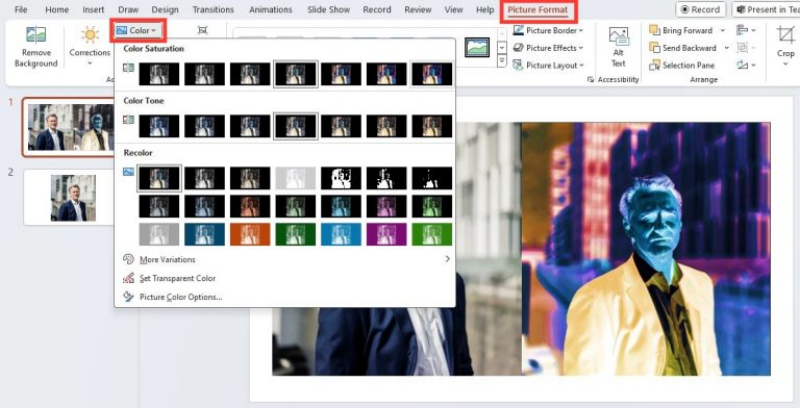
Adjust Picture Effects: In the Format Picture pane that appears on the right, navigate to Picture Corrections or Picture Color. Like in Word, PowerPoint doesn’t have a one-click “invert” button, but by adjusting the Brightness to -100% and the Contrast to 100%, you can create an inverted effect that closely mimics true inversion.
![Select Invert Image on PowerPoint]()
-
Save the Presentation: Once you’re happy with the effect, save your PowerPoint file, or export the slide as an image by right-clicking the slide thumbnail and selecting Save As Picture.
PowerPoint’s method for inverting colors is quick and easy, making it ideal for presentations that need simple yet effective visual transformations.
How to Invert a Picture on iPhone
For quick on-the-go edits, you can invert a picture directly on your iPhone using built-in accessibility features or a third-party app. Below are the method to achieve this.
-
Open Settings: On your iPhone, go to the Settings app.
-
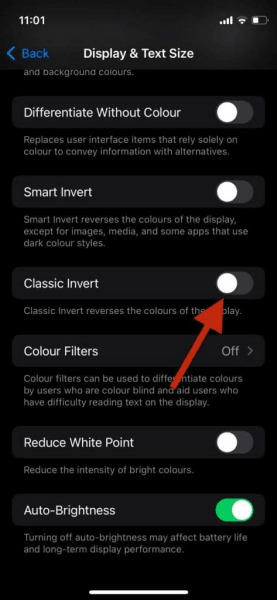
Navigate to accessibility: Scroll down and tap on Accessibility, then tap on Display & Text Size.
-
Enable classic invert: Toggle on the Classic Invert option. This will invert all the colors on your screen, including any photos you view.
![Invert Image on iOS]()
-
View the inverted picture: Open your Photos app and select the image you want to invert. The colors will automatically appear inverted due to the Classic Invert setting.
-
Screenshot the inverted image: To save the inverted picture, take a screenshot by pressing the Side button + Volume Up button simultaneously.
-
Disable classic invert: Once you’ve saved the screenshot, go back to Settings > Accessibility and toggle off Classic Invert.
This method is quick but inverts the entire screen. For a more targeted approach, you can use third-party apps like Photoshop Express or Snapseed from the App Store, which offer direct invert features.
How to Colorize Black and White Photos with AI

In addition to inverting pictures, you may also want to breathe new life into old black-and-white photos by colorizing them. AI tools make this process simple and effective, with one such tool being FliFlik KlearMax for Photo. This AI-powered application automates the process of colorizing black-and-white images, offering impressive results in a matter of seconds. So if you want to undo the color inversion you can use this tool to achieve that easily.
Using AI tools like FliFlik KlearMax for Photo eliminates the need for extensive manual editing, offering a simple solution for turning monochrome images into vibrant, full-color photos.
Conclusion
Learning how to invert a picture is a valuable skill, whether you’re doing it for professional reasons or personal projects. From Photoshop’s advanced capabilities to basic inverting methods in Word, PowerPoint, and iPhone, each tool offers a different way to achieve the desired effect. Inverting a picture can dramatically change its appearance, offering unique visual contrasts that can enhance designs, presentations, or social media posts. Beyond inversion, AI tools like FliFlik KlearMax for Photo take image manipulation a step further by enabling users to colorize black-and-white photos with just a few clicks. These innovative techniques offer endless possibilities for transforming your photos and designs with ease.
FREE DOWNLOAD
Secure Download
Coming Soon
Secure Download


