Sharpening is an important photo editing technique that improves the clarity and crispness of your images, making them look more defined and vibrant. This process involves adjusting the contrast of edges within the photo, which can help bring out fine details. You can make your pictures more vibrant and lively in many ways. Among them, Photoshop is a reliable tool as it offers different filters like the Unsharp Mask or Smart Sharpen to enhance different types of images. In this article, you will learn how to sharpen an image in Photoshop by following simple steps.
When Do You Need To Sharpen An Image?
If you want to sharpen blurry images in Photoshop, knowing when to do it is important. This will significantly impact your results. Here are some common situations where sharpening is helpful:
Blurry Photos
Sharpening can bring back most of the lost details and improve the overall clarity of blurry photos. But it’s important to know that while sharpening can improve slight blurriness, it won’t fix severe focus issues.
Low-Resolution Images
The low-resolution images are soft and lack detail because there aren’t enough pixels to define the finer points. Sharpening can help by increasing the contrast around the edges, making the image appear more defined.
Photos Taken In Low Light
Photos taken in low light might come out blurry because the camera’s shutter speed is slower. Therefore, increasing their sharpness can make them appear clearer and more vibrant by increasing the contrast and bringing out more details.
After Resizing Images
Bigger images are less sharp because of the resizing process. Adding sharpening after resizing can help to bring back some of the lost detail and crispness. This step is important if you want to print a high-resolution image.
Enhancing Details
Sometimes, you might want to make specific details in an image, like textures, patterns, or fine lines, more noticeable. Sharpening can help these details stand out by making the edges clearer, improving the contrast and the overall appearance.
How To Sharpen An Image In Photoshop
If you are wondering how to fix blurry pictures in Photoshop, you should know that sharpening is an essential step. Photoshop offers various ways to brighten up your visuals with its advanced tools. Following are 4 of the best ones that you can use:
1: Using Smart Sharpen
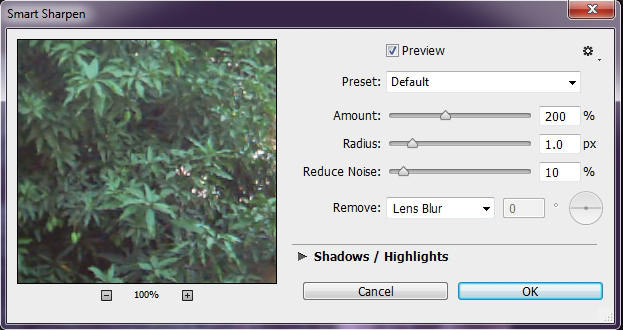
Smart Sharpen in Photoshop is a tool that makes images clearer while reducing noise and unwanted effects. Unlike basic tools, it offers advanced options to adjust the process. It allows you to control the amount of sharpening and reduce the effects of Gaussian blur. This method is especially useful for fixing slightly blurry images with precise adjustments.

To use smart sharpen in Photoshop:
- Open your image in Photoshop.
- Go to Filter > Sharpen > Smart Sharpen.
- Adjust the Amount and Radius sliders to sharpen the image in the Smart Sharpen dialog box.
- Click OK to apply the sharpening.
2: Using Unsharp Mask
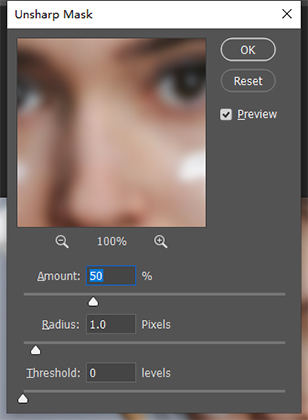
The Unsharp Mask method is widely used to make images appear sharper by enhancing edges and increasing overall detail. It involves creating a high-contrast copy of the original image and blending it with the original to make the edges stand out. It is great to bring out fine details.

To use unsharp mask in Photoshop:
- Open your picture in Photoshop.
- Navigate to Filter > Sharpen > Unsharp Mask.
- Adjust the Amount slider to control the strength of the sharpening. Set the Radius to control how much area around each pixel is affected.
- Click OK to apply the sharpening effect.
3: Using Camera Raw Filter
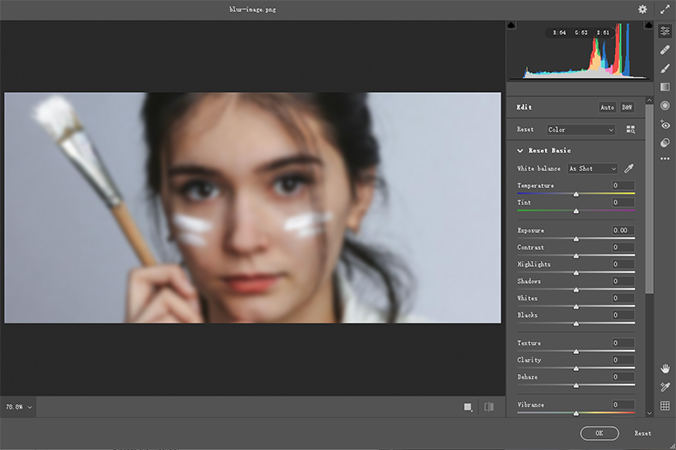
Camera Raw Filter in Photoshop has advanced sharpening controls that can precisely enhance image details. It allows you to fine-tune the effects by adjusting the amount of sharpening and the Radius applied to the edges. This Filter is beneficial for making detailed adjustments to sharpen an image effectively.

To use camera raw in Photoshop:
- Open the visual with Photoshop.
- Go to Filter > Camera Raw Filter.
- Now select the Detail panel in the Camera Raw dialogue box.
- Adjust the Amount and Radius sliders under the Sharpening section to enhance the details. Click OK to apply the adjustments.
4: Using High Pass Filter

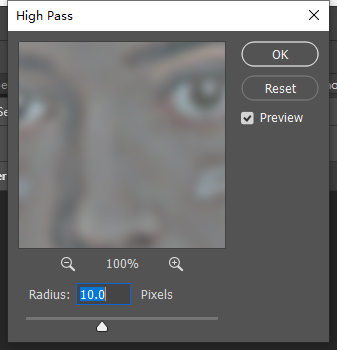
The High Pass Filter is a technique that makes the edges in an image look clearer by increasing the difference between adjacent pixels. This method makes specific areas, like textures and fine details, look sharper without changing the image. Moreover, it lets you emphasize the image details and textures effectively.
To use high pass filter in Photoshop:
- Open your photo in Photoshop.
- Duplicate the image layer by right-clicking and selecting Duplicate Layer.
- Go to Filter > Other > High Pass with the duplicated layer selected.
- Adjust the Radius to control detail, then set the layer mode to Overlay or Soft Light.
How To Sharpen Blurry Image Instantly In 1-Click
If you’ve ever had a blurry photo and wanted a quick fix, KlearMax for Photo has an easy tool to sharpen your images instantly with just one click. This user-friendly software makes it simple to enhance your photos. Moreover, it offers several other tools to correct the blurriness and highlight the image details without complex editing. FliFlik KlearMax for Photo helps you get professional-quality results easily.

Features
- Instantly sharpen blurry images with a single click, making it quick and easy.
- Enhances fine details in your images, ensuring clear textures and edges.
- It automatically detects and corrects the blurriness from photos.
- It features a simple interface that allows users to navigate it easily.
To sharpen an image in KlearMax for Photo:
-
Download KlearMax for Photo on the PC. Install and launch the software.
FREE DOWNLOADSecure Download
Coming SoonSecure Download
-
Import the blurry image you want to sharpen. Select the One-Click Sharpening option in the Face Model to instantly enhance the clarity of your image. The software will automatically correct the blurriness.
![KlearMax AI Models]()
-
After sharpening, click Export to store the enhanced image on your device.
![Export the Images]()
Final Words
Knowing how to sharpen an image in Photoshop is important for improving your photos and highlighting their best features. You can use different tools, such as Smart Sharpen, Unsharp Mask, Camera Raw Filter, and High Pass Filter, each with benefits for making your images clearer and sharper. However, you can try KlearMax for Photo if you want a simpler option. It offers one-click sharpening using advanced technology to quickly fix blurry images and enhance overall photo quality. It also offers various other features to enhance your visual in the best possible way.
Coming Soon


