When working with digital images, sometimes you need to enhance their resolution without sacrificing quality. Whether it’s for a creative project or simply improving the sharpness of an image, upscaling can be a crucial process. If you’re using Krita, a popular open-source digital painting tool, you might be wondering how to upscale images effectively.
In this article, we’ll walk you through the steps to upscale images with Krita, explore some limitations, and introduce a third-party tool, FliFlik KlearMax, to enhance your image quality even further. Read on to learn how to achieve the best results when upscaling your images with Krita.
What is Krita
Krita is a free and open-source digital painting program used by artists for creating high-quality artwork, illustrations, and animations. Its powerful brush engine, customizable interface, and robust painting tools make it a preferred choice among digital artists. Krita supports raster graphics and offers features like layers, masks, and blending modes, enabling detailed and complex artwork.
However, Krita’s primary focus is on painting and illustration rather than advanced image editing or AI-driven enhancement. When it comes to upscaling or enlarging an image, Krita provides basic tools that allow users to increase the image size and resolution. The challenge, though, is that enlarging an image in Krita can sometimes result in a loss of quality, such as pixelation or blurriness, because the software lacks sophisticated algorithms for enhancing images during the upscaling process.
Step by Step to Upscale Images in Krita
Although Krita doesn’t have advanced AI tools for upscaling like some specialized photo-editing software, you can still increase the resolution of your images with the built-in tools. Here’s how you can do it:
Step 1: Open Your Image in Krita
To begin, launch Krita and open the image you want to upscale. Navigate to File -> Open and select your image from the computer.
Step 2: Check the Image’s Current Resolution
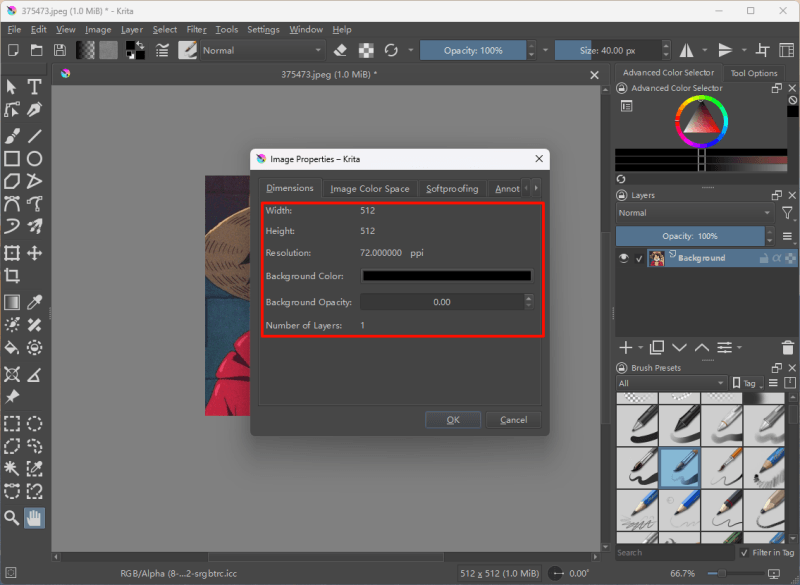
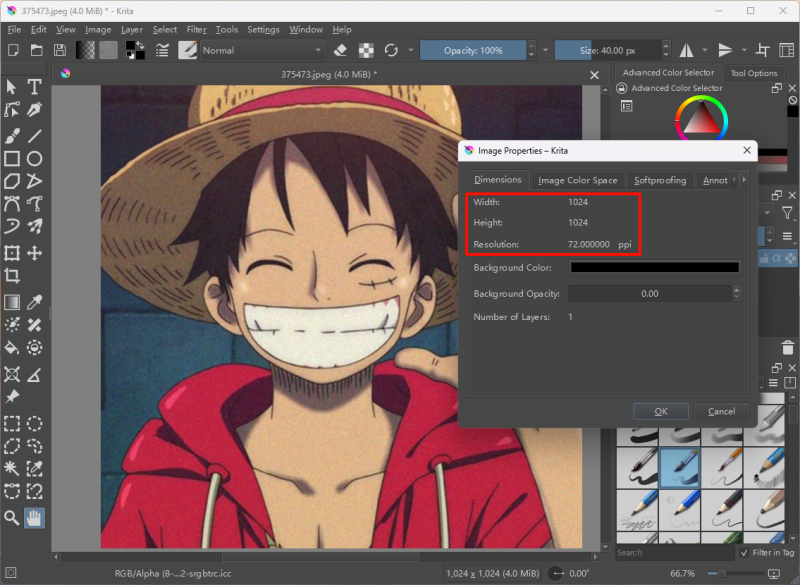
Before changing the resolution, you should know the current resolution and dimensions of the image. To check, go to Image > Properties. This window will show the image size, resolution (in pixels per inch, or PPI), and other properties.
Step 3: Resize the Image
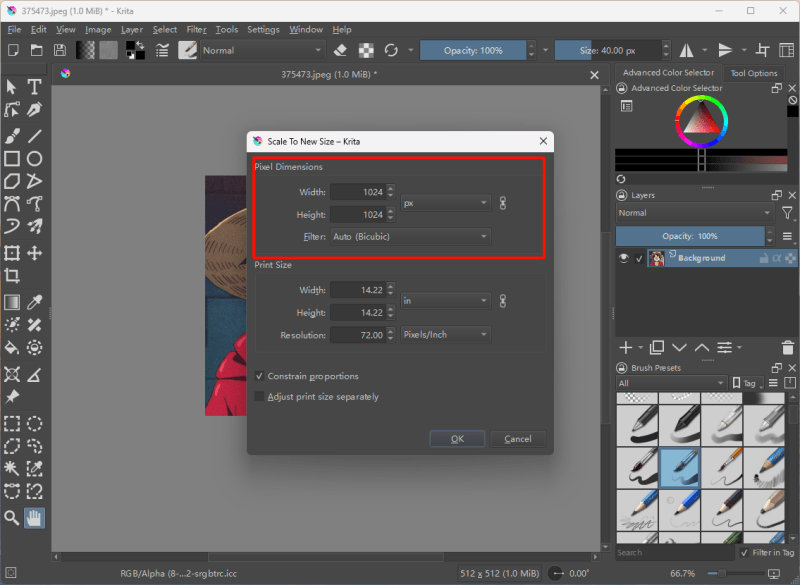
To resize the image, go to Image > Scale Image to New Size. A new window will pop up where you can adjust the image dimensions manually.
- Width & Height: You can increase the width and height of the image to your desired size. Keep in mind that increasing these too much can lead to a loss of quality.
- Resolution: This option allows you to set the desired resolution. For high-quality prints, a resolution of 300 PPI is recommended, while a lower resolution (around 72 PPI) is suitable for web use.
Step 4: Choose the Resampling Method
When upscaling an image, Krita allows you to choose a resampling method, which determines how the new pixels are generated. In the same Scale Image to New Size window, you’ll find the Filter option for selecting the resampling method. The most commonly used methods include:
- Bilinear: A basic method that calculates the average of surrounding pixels. It’s faster but may result in a blurry image.
- Bicubic: A more advanced method that often produces smoother results when enlarging images.
- Nearest Neighbor: A method that copies the nearest pixel to the new size. It is fast but results in a pixelated image.
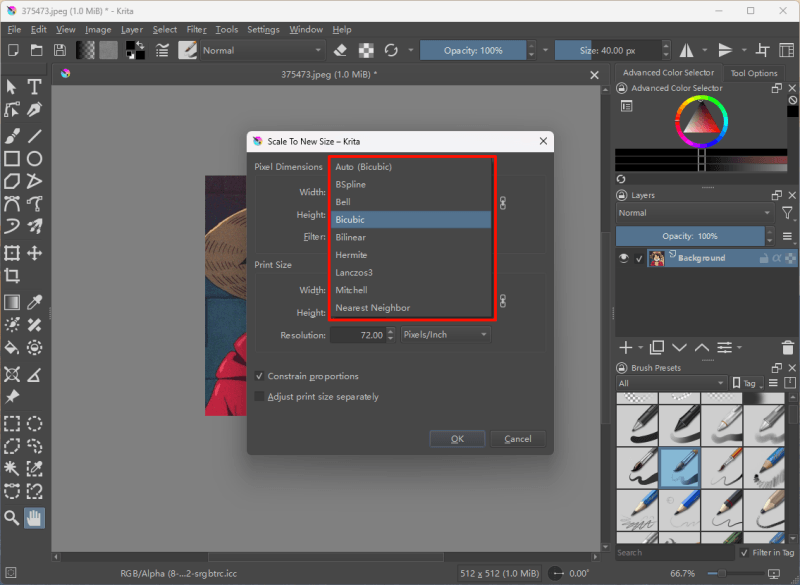
For upscaling, Bicubic is generally the best option because it provides smoother transitions between pixels, which helps reduce pixelation.
Step 5: Apply and Save the Upscaled Image
Once you have set the desired size, resolution, and resampling method, click OK. Krita will process the image and enlarge it. After resizing, review the image for any quality issues like blurriness or pixelation. Finally, save your upscaled image by navigating to File -> Save As, and choose your preferred file format (PNG, JPEG, etc.).
Limitation of Krita’s Image Upscaling
It’s important to note that because Krita doesn’t have AI-enhanced upscaling features, enlarging images can result in a loss of sharpness, making it challenging to maintain high-quality output for large-sized images. This limitation makes Krita more suitable for painting and drawing than for photo enhancement.
How to Upscale Images While Enhancing Photo Quality
If you are looking for a way to upscale images while retaining or even improving image quality, Krita’s basic upscaling tools might not be enough. Fortunately, third-party software solutions can complement Krita’s capabilities. FliFlik KlearMax for Photo is a sophisticated AI-driven software designed specifically for photo enhancement and image upscaling.
KlearMax for Photo is a photo enhancement tool that uses advanced AI technology to upscale images without sacrificing quality. It intelligently adds pixels to the image, ensuring that details remain sharp and that the image doesn’t become pixelated or blurry. This software is ideal for photographers, designers, and artists who need to upscale images for print or large-format displays without losing clarity.
How to Upscale Umages to 8K without Losing Quality
-
First, download and install FliFlik KlearMax for Photo on your computer by clicking the button below. Then, upload the image you want to upscale. Simply click Upload Image and select the file from your computer.
FREE DOWNLOAD
Secure Download
Coming Soon
Secure Download -
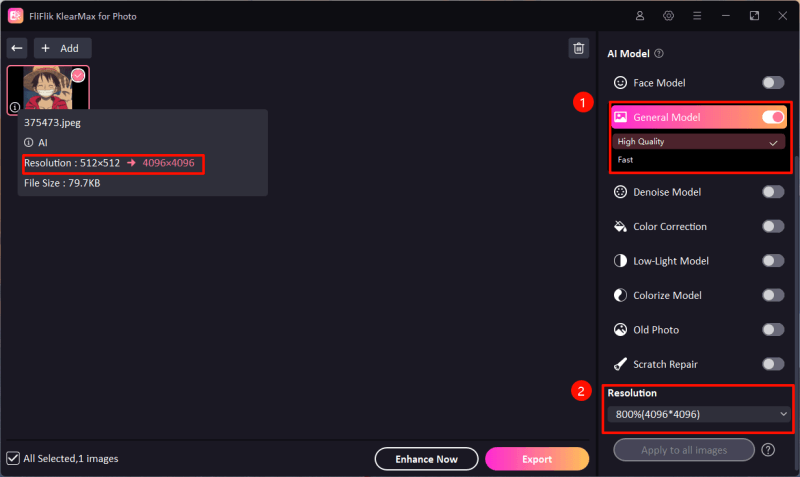
In FliFlik KlearMax for Photo, you can choose the scaling factor (e.g., 2x, 4x, 8x) depending on how large you want the image to be. You can also manually enter the desired resolution. The AI engine will automatically calculate the best pixel distribution to maintain the image’s quality.
![KlearMax for Photo Upscale Image]()
-
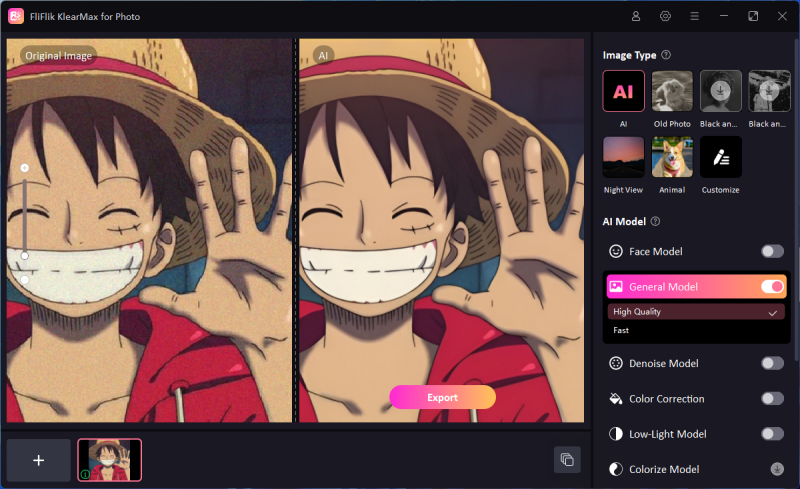
Once you’ve selected the resolution, click on the “Enhance Now” button. The software’s AI engine will process the image, upscale it, and simultaneously enhance details, textures, and edges to ensure high-quality output.
![Enhanced image]()
-
After the enhancement is complete, preview the image to ensure the quality is as expected. Finally, save the image by clicking Export. To the choose the format that best suits your needs click on settings then select Save As.
By using FliFlik KlearMax for Photo in combination with Krita, you can not only upscale your images but also enhance their quality, achieving the best of both worlds for your creative projects.
FAQs about Krita
1. Can I Save High-Quality Images in Krita?
Yes, Krita allows you to save high-quality images. You can export images in various formats like PNG, JPEG, and TIFF. To ensure the best quality, adjust the image resolution to 300 PPI before saving, especially if you’re planning to print the image.
2. Can I Download Custom Brushes for Krita?
Yes, Krita supports a wide range of custom brushes. You can download them from various online sources or Krita’s resource page. To install them, go to Settings -> Manage Resources and click on Import Brushes. You can also create and customize your own brushes for specific projects.
3. Does Krita Support Vector Graphics?
Yes, Krita has basic support for vector graphics. You can create vector shapes and text using the vector tools in the toolbar. However, Krita’s vector features are not as advanced as those in specialized vector programs like Adobe Illustrator.
4. Can Krita Be Used for Animation?
Yes, Krita has an animation feature that allows you to create 2D animations. You can use the timeline feature to create frame-by-frame animations and export them as videos or GIFs. While it’s not as advanced as professional animation software, it’s a great tool for beginners and artists looking to create simple animations.
Conclusion
Krita is an excellent tool for digital painting and basic image editing, but when it comes to upscaling images, its limitations can result in quality loss. By following the steps outlined in this article, you can enlarge images in Krita, although you may encounter issues like blurriness or pixelation. For better results, consider using an AI-driven tool like FliFlik KlearMax for Photo to enhance image quality while upscaling. Combining these tools can help you achieve sharp, high-resolution images for any project.
FREE DOWNLOAD
Secure Download
Coming Soon
Secure Download
