Dots per inch (DPI) measures an image’s resolution, indicating the number of individual dots that can be placed in a line within a one-inch span. Increasing DPI is crucial for enhancing image clarity and detail, especially for printing purposes, where higher DPI results in sharper, more professional-looking outputs. Additionally, higher DPI also ensures images retain their quality when resized or zoomed in. This article will guide you through four effective methods to increase the DPI of your images.
Part 1. Best Way to Increase DPI of Image with AI
In FliFlik KlearMax for Photo, increasing the Dots Per Inch (DPI) is done by the AI. It uses algorithms trained for many hours in order to enhance photos. You can use this software in many ways such as to increase dpi of image, retouching, and unblurring portraits. It accepts many image formats inputs hence streamlining users workflow. Some ot the notable formats that FliFlik KlearMax for Photo supports include WEBP, BMP, JPG, PNG and more.
FliFlik KlearMax for Photo contains all the editing tools that you would need to enhance the quailty of pictures under one roof. This means you dont have to install many programs on your computer to get different things done. Whether you wish to improve landscapes, denoise night photos, ehhance fur deatails or enhance anime photos KlearMax makes it effortless.
Steps to increase the DPI of the images with KlearMax for Photo
Visit the official download page and download it in your computer. Once the download is complete, double click on the setup file to begin installation. Ensure to acept the terms and follow a few easy prompts.
FREE DOWNLOADSecure Download
Coming SoonSecure Download
This software allows users to increase the DPI of many images at once. Click on the + icon to add more images. Note that you can apply different enhancements while batch editing.
![Unpixelate images with KlearMax for Photo]()
If you want a model specifically trained to enhance the face, you can choose face model. Otherwise, to increase the DPI for landscapes, animals, plants and architecture choose the general method. For other images such as cartoons, games and animes choose the Denoise model. Finally click on enhance now.
![KlearMax Bacth Processing]()
Once your are done enhancement, preview the images to make sure everything is on point. Next, click on the export button then choose the the folder and image format. Lastly, click on yes to apply changes. You can now share your images on social media or with friends.
![Change Voice to Darth Vader]()
You can check out the properties of images by mouseover the image.
![Check out the resolution on KlearMax]()
Part 2. How to Change DPI of Image with Photoshop
Adobe Photoshop is an image editing software widely used by photographers, graphic designers, and digital artists. One crucial aspect of Photoshop is its ability to handle high-resolution images, essential for professional-quality prints. This is where DPI, or dots per inch, comes into play. DPI measures the resolution of a printed image, with higher DPI values indicating more detail and clarity. In Photoshop, users can set the DPI to ensure their images are suitable for different print media, maintaining sharpness and quality. Overall, Photoshop is an industry-standard tool for creating and refining visual content.
Steps to increase the DPI of the images with Photoshop
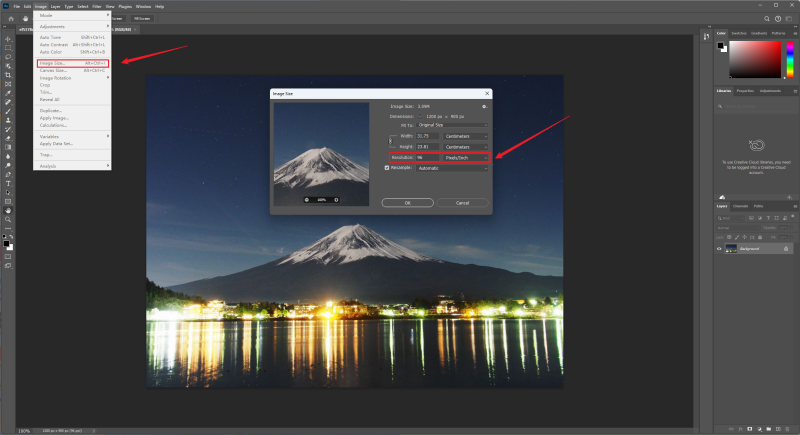
Launch Photoshop and open the image file you want to modify. Go to the top menu and click on Image > Image Size. This will open the Image Size dialog box.
In the Image Size dialog box, locate the Resolution field. Ensure that the measurement unit is set to Pixels/Inch. Enter the desired DPI value.
![Change DPI on Photoshop]()
If you want to change the DPI without altering the pixel dimensions of the image, make sure the Resample option is unchecked.
Click OK to apply the changes. Photoshop will adjust the DPI according to your specifications. Save the image by going to File > Save As then choose the desired file format and location.
Part 3. How Do you Change the DPI of a Photo Online
Convert.town is a versatile online tool designed to simplify various digital conversions, catering to a wide range of needs from file format changes to unit conversions. The platform provides a user-friendly interface that allows users to quickly convert documents, images, audio files, and more without needing to download software.Convert.town is particularly useful for professionals and students who require quick and reliable conversion services. It supports high-quality outputs and ensures that the integrity of the original files is maintained.
Steps to change DPI of a Photo with Convert.town
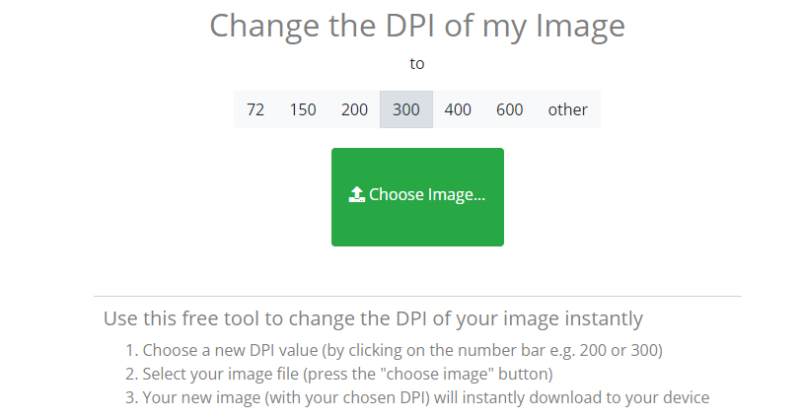
Open your web browser and go to https://convert.town/image-dpi.
Select your desired DPI from the preset values. You can click other if you dont see a value you would like.
![Change DPI of a Photo Online]()
If you want to change the DPI without altering the pixel dimensions of the image, make sure the Resample option is unchecked.
Click on the Choose File button to upload the image file you want to modify from your computer. Once you upload convert.town will start the process of changing DPI and download will begin immediately.
Part 4. How to Increase DPI of Image on iPhone
DPI (Dots Per Inch) is an app designed to enhance your digital image management on iPhone and iPad. It allows precise control over image resolution and quality, making it ideal for photographers, designers, and digital artists. With DPI, you can effortlessly resize, convert, and compress images without compromising their quality. The app supports various file formats, ensuring compatibility with your projects.

Steps to change DPI of a Photo with DPI on iPhone
Go to the App Store on your iPhone then Search for “DPI (Dots Per Inch)”. Download and install it.
Locate the DPI app icon on your home screen and tap the icon to open the app.
Tap the + or Import button. Next, choose the image you wish to edit from your photo library or cloud storage.
Once the image is loaded, locate the DPI adjustment settings. Input the desired DPI value. You can typically find this option under a menu or slider labeled DPI or Resolution.
Review your settings and make sure everything is as desired. Finally, tap the Apply or Save button to process the image.
Look for the Save, Export, or Share buttons and choose your preferred destination.
Part 5. Everything You Should Know about DPI
1. What is DPI of Image?
DPI stands for Dots Per Inch. It refers to the resolution of an image, specifically how many dots (or pixels) are packed into one inch of the image. A higher DPI means more dots per inch, resulting in a higher-resolution image.
2. Why to Increase DPI of Image?
Increasing the DPI of an image can improve its print quality. Printers often require images with higher DPI (usually 300 DPI or more) to produce sharp and clear prints without pixelation. It ensures that the image appears crisp and detailed when printed on paper.
3. How to Check the DPI of Pictures?
For Windows users right-click the image file, select Properties, go to the Details tab, and look for the Resolution or Image section. If you are on a Mac open the image in Preview, go to Tools > Show Inspector (Command + I), and under the More Info section, look for Resolution.
Conclusion
Increasing the DPI of your images is essential for achieving high-quality prints and ensuring your digital visuals look their best on high-resolution screens. By using tools like FliFlik KlearMax for Photo, Adobe Photoshop, Convert.town, and the DPI app for iPhone, you can easily increase the DPI of image files to meet professional standards. Whether you’re working with landscapes, portraits, or digital art, these methods provide effective solutions to increase the DPI of your images, enhancing clarity and detail. For the most comprehensive and user-friendly experience, we recommend using FliFlik KlearMax for all your image editing needs.


