We all are well familiar with the importance of branding and protecting our digital images. As photographers or digital artists, applying a watermark is crucial for maintaining ownership and preventing unauthorized use. Learning how to add watermark in Lightroom offers a straightforward solution to safeguard your work. Adobe Lightroom, both on desktop and mobile, provides efficient tools to embed watermarks during the editing process. This guide will help you through each step, ensuring that your images are branded consistently and professionally, no matter where you display them.
Things You Should Know Before Adding Watermark in Lightroom
When adding watermarks in Lightroom, consider some limitations. Lightroom provides basic watermarking capabilities, suitable for text and simple graphic marks. However, it lacks advanced features like freely rotating or dragging watermarks across the image, which some users may find restrictive. Also, while Lightroom allows for opacity adjustments and basic positioning, it doesn’t support more intricate watermark placements or dynamic scaling across different image sizes. It’s important to know these limitations to effectively use Lightroom’s watermarking for branding and protecting your photographs.
How to Add a Watermark on Lightroom Classic
Adding a watermark in Lightroom Classic is a crucial step for photographers looking to protect their work and reinforce brand identity. This process is relatively straightforward and can be customized to fit various aesthetic preferences. Whether you choose to create a text-based watermark or use a graphic logo, Lightroom Classic allows you to embed these marks into your images during the export process, ensuring they appear consistently across all your photos. Learning how to add watermark in Lightroom Classic enhances your images’ security and professional presentation, making it a valuable skill for any photographer.
🔘 1: Add Text Watermark
Adding a text watermark in Lightroom Classic is a useful technique for photographers who want to protect their images and brand them with their name or business logo. Here’s how you can do it:

Step 1: Navigate to ‘Edit’ in the top menu and select ‘Edit Watermarks…’ to launch the Watermark Editor.
Step 2: Choose the ‘Text’ option, enter your desired text, and customize the font, size, and color according to your branding.
Step 3: Position the watermark using the anchor points, adjust the opacity to your preference, and then save your settings for future use.
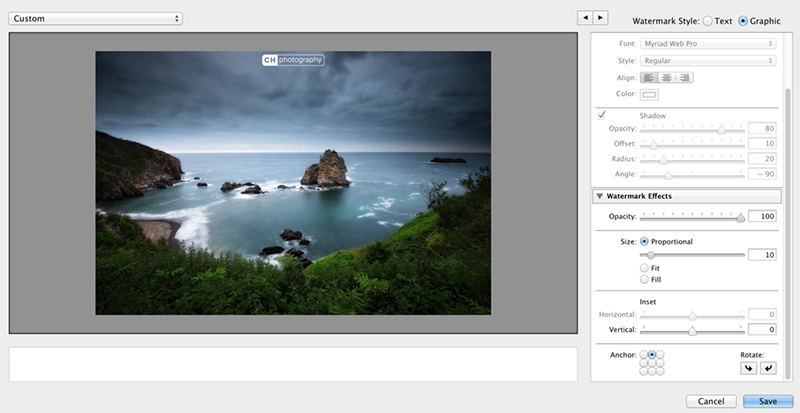
🔘 2: Add Graphical Watermark
Adding a graphical watermark in Lightroom Classic is an effective way to brand your photos with a logo or any other graphic that represents your work or business. Here’s a streamlined process:

Step 1: In Lightroom Classic, go to ‘Edit’ and select ‘Edit Watermarks…’ to open the Watermark Editor.
Step 2: In the Watermark Editor, select the ‘Graphic’ option. You can then upload your logo or any other image file that you wish to use as a watermark.
Step 3: Once your graphic is uploaded, you can adjust its size, position, and opacity to ensure it complements the image without overshadowing the content. Use the anchor points for positioning and the sliders for size and opacity adjustments.
Step 4: After customizing your watermark, save the settings as a new preset for future use. This preset can then be applied to your images automatically during the export process.
How to Add a Watermark in Lightroom Mobile
Adding a watermark in Lightroom Mobile is a straightforward process that ensures your images are branded or protected, regardless of whether you’re using iOS or Android devices. Here’s how you can do it:

Step 1:Start by opening the photo you want to watermark in Lightroom Mobile.
Step 2:Tap on the share icon, usually located at the top right of the screen, and then select “Export as…”.
Step 3:In the export settings, look for an option labeled “Include Watermark” and toggle it on. After enabling this, tap on “Customize” to proceed to the watermark editing menu.
Step 4:Here, you can choose to create a text watermark or upload a graphic (preferably a PNG for transparency). Adjust the size, positioning, and opacity to ensure the watermark blends well with the image without overpowering it.
How to Add Watermark to Multiple Pictures in Lightroom
Adding a watermark to multiple pictures in Adobe Lightroom ensures your images are branded consistently and protects them from unauthorized use. This process can be streamlined in both the desktop and mobile versions of Adobe Lightroom. Here’s how to add watermark in adobe lightroom:

Step 1:In Lightroom, start by selecting the images you want to watermark. You can click on individual images while holding down the “Ctrl” (Windows) or “Cmd” (Mac) key to select multiple images.
Step 2:Once your images are selected, go to the “File” menu and choose “Export”. This opens the export dialog where you can set the parameters for how your images will be saved and shared.
Step 3:In the export settings, you can choose the file format, resolution, and other relevant options. Scroll down to the “Watermarking” section.
Step 4:Check the box next to “Watermark” and choose the watermark you wish to apply. If you haven’t already created a watermark, Lightroom allows you to create a new one by selecting ‘Edit Watermarks’ from the dropdown menu.
Step 5:After setting up your watermark and other export options, click the “Export” button. Lightroom will apply the watermark to all selected images as they are exported.
Best Alternative – Add Watermark to Photos Instantly in Stack
While Lightroom Classic is a go-to for many when adding watermarks, KleanOut for Photo introduces advanced features that elevate this functionality. Unlike Lightroom, which limits users to choosing between text or graphic watermarks, KleanOut for Photo allows for both to be added simultaneously, either as combined elements or separately.
It also offers a distinctive tiling feature, enabling users to fill entire images with repeated watermarks that can be aligned either straight or diagonally, providing complete customization over the spacing and appearance of these marks. This makes KleanOut for Photo a versatile tool for photographers seeking comprehensive watermarking solutions.

Features
- You can easily add both text and image watermarks to your photos, enhancing your brand visibility or protecting against unauthorized use.
- KleanOut for Photo also offers a tool to remove watermarks from pictures, which is helpful if you need to clean up old photos or repurpose images legally.
- For multiple images, KleanOut for Photo supports batch processing to remove watermarks, saving time and effort when handling large collections.
- The software supports importing and exporting various image formats such as JPG, JPEG, PNG, BMP, TIFF, and TIF, making it versatile for different photographic needs.
To add watermark to photo in KleanOut for Photo:
Download and install KleanOut for Photo on your PC. Launch the program and select “Add Watermark to Image” from the main interface.
FREE DOWNLOADSecure Download
FREE DOWNLOADSecure Download
Import the images you want to watermark. Use the tools to create a unique watermark by combining text and images. You can adjust the opacity, font, color, and size of your watermark.
![kleanout for photo create image watermark]()
Once you are happy with the results, click on the “Export” or “Export All” button to save all the images with watermark.
Conclusion
Now that we’ve explored how to add a watermark in Lightroom and its alternatives, it’s clear that KleanOut for Photo stands out for its robust functionality. With features that allow for complete image coverage with repeated watermarks, and tools for both adding and removing watermarks efficiently, KleanOut for Photo is highly recommended for anyone looking to enhance their digital image protection and branding.

