If you are using Apple Music consistently, then you understand that you need to make playlists for easier access. For anyone, this is a significant part of your daily routine, considering its vast library and the seamless listening experience. Many users have reported encountering this issue, often described as “Apple Music playlist gone,” due to various reasons such as subscription changes, iCloud sync errors, or software updates. This sudden loss can disrupt your music experience and leave you searching for answers.
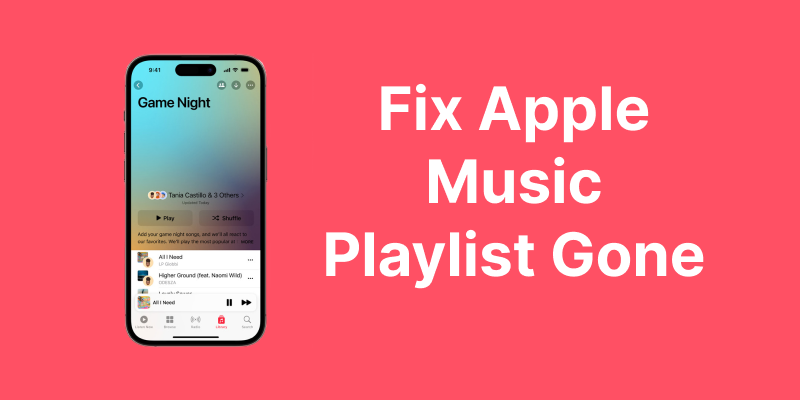
Think about how it would feel to open Apple Music and find all your playlists gone. The thought of moving on to other services may cross one’s mind, but the feeling of losing it all built up is just too much to handle. The good news? You aren’t alone, and there’s hope. By following these tips, you can restore your playlists and ensure a seamless listening experience across all your devices. Read on to find out how to fix this issue and safeguard your Apple Music library!
Part 1. 5 Reasons My Apple Music Playlist is Gone
Identifying the cause of your gone playlists is essential, as each issue requires a specific solution. Below, we’ve outlined some of the most common reasons your Apple Music playlists may have gone:
- iCloud Sync Issue: A disabled or faulty iCloud Music Library can prevent playlists from syncing properly across your devices.
- Apple Music Subscription Status Change: If your subscription expires or is downgraded, access to your playlists and downloaded songs may be restricted.
- Apple Music Software Updates: Updates can occasionally reset settings or cause temporary glitches that affect your music library.
- Network Issue: Poor or unstable internet connections can disrupt Apple Music, causing playlists to temporarily disappear from your account.
- Account Mismatch: Logging into the wrong Apple ID or using multiple accounts can lead to playlists being inaccessible.
Part 2. 8 Methods to Fix My Apple Music Playlist is Gone
1. Check Apple Music Subscription
Your Apple Music subscription is what keeps your playlists and music library alive. If your subscription expires, is cancelled, or a problem occurs with a payment, you might temporarily lose playlists. Luckily, you can easily check and renew your Apple Music subscription to restore access to your music library. Here’s how:
Windows/Mac
- Step 1: Open the Music app on your Mac or iTunes on your Windows PC.
- Step 2: If you’re not already logged in, click “Account” in the top menu bar.
- Step 3: Select “Sign In” and enter your Apple ID and password.
- Step 4: After signing in, navigate back to the “Account” menu.
- Step 5: Choose “View My Account,” and you may be asked to re-enter your password for verification.
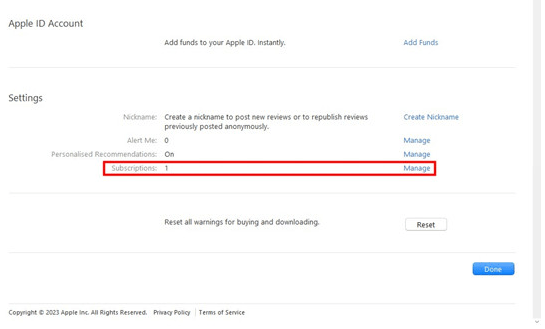
- Step 6: Scroll down to the “Settings” section and locate the “Subscriptions” option.
- Step 7: Check the status of your Apple Music subscription listed there.
- Step 8: If your subscription has expired, you’ll see an option to “Subscribe.”
- Step 9: Click on “Subscribe” to renew your Apple Music subscription and regain access to your playlists.
iOS
- Step 1: Open the “Settings” app.
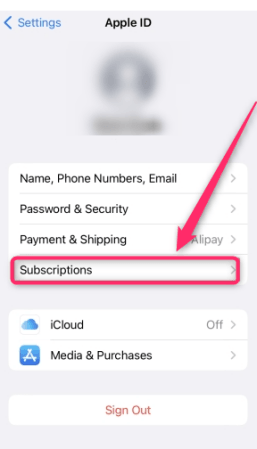
- Step 2: At the top of the screen, tap your name and Apple ID profile picture. This will direct you to your Apple ID settings.
- Step 3: Scroll down and select “Subscriptions.”
2. Turn ‘Show Apple Music’ On
Sometimes, after the latest software release for your device, some Apple Music playlists disappear. It could be an issue with iTunes failing to sync your account properly across all devices or because of some other change in settings.
iOS
- Step 1: Open the “Settings” app on your device.
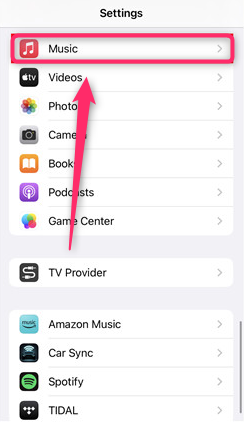
- Step 2: Scroll down and select “Music” from the list of options.
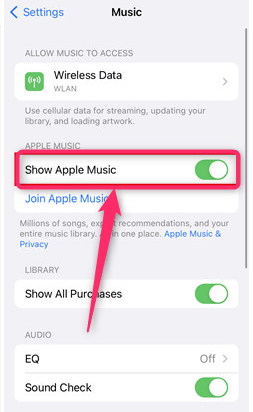
- Step 3: Look for the “Show Apple Music” setting.
- Step 4: If the “Show Apple Music” toggle is off (grey), tap it to turn it on (green).
- Step 5: Open the Music app to check if your playlists are now visible.
3. Check on Different Devices
If your Apple Music playlists are missing on one device, it’s worth checking other devices where you’re logged in. Sometimes, syncing issues or settings discrepancies can cause playlists to appear on one device but not another. Ensuring that your Apple Music account is properly synced across all devices can help restore access.
For Windows/Mac
- Step 1: Launch the Music app or iTunes on your Windows PC or Mac.
- Step 2: Check the “Playlists” section to see if your playlists are visible.
- Step 3: If they’re missing, try checking your playlists on other devices.
iOS/Android
- Step 1: Open the Apple Music app on your device.
- Step 2: Go to the “Library” and tap the “Playlists” section.
- Step 3: Check if your playlists are visible.
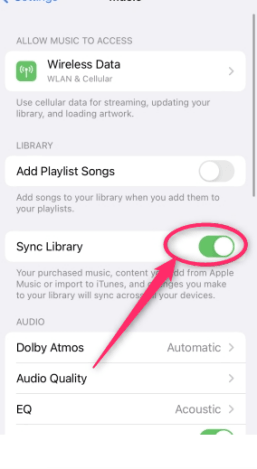
4. Turn Sync Music Library On
Enabling the “Sync Music Library” feature ensures that your music, playlists, and other content are synced across all your Apple devices. If this option is turned off, your playlists may not appear consistently, leading to missing tracks or playlists. Turning this feature on can restore access to your music library on all devices.
For Mac
- Step 1: Launch the Apple Music app, From the menu bar at the top of your screen, select Music > Preferences.
- Step 2: In the General tab, uncheck the “Sync Library” option to disable it.
- Step 3: Wait for a moment, then check the box again to turn it back on.
For iOS
- Step 1: Navigate to Settings > Music. Disable the “Sync Library” option, then restart your device.
- Step 2: Once it’s restarted, turn “Sync Library” back on.
5. Sign Out and Sign In
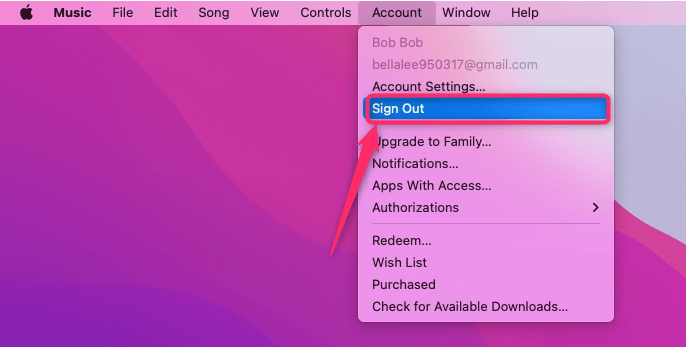
Signing out and signing back into your Apple Music account can help resolve syncing issues and restore access to missing playlists.
For Mac
- Step 1: Open iTunes or the Music app on your Windows PC or Mac.
- Step 2: Click “Account” in the top menu bar. Select “Sign Out” from the dropdown menu.
- Step 3: Click “Account” again and choose “Sign In.”
- Step 4: Enter your Apple ID and password.
- Step 5: Wait for your Apple Music library to refresh.
- Step 6: Check if your playlists are now visible under the “Playlists” section.
6. Update iCloud Music Library with iTunes
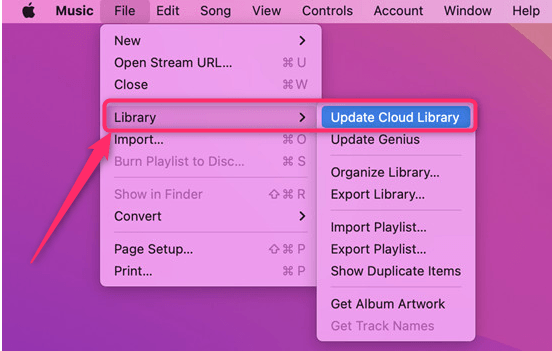
Updating your iCloud Music Library The Music app ensures that your music library and playlists are accurately synced with your iCloud account. This process can fix syncing errors and recover missing playlists by re-uploading playlist data.
For Mac
- Step 1: Launch the Music app on your Mac. From the top menu bar, click “Music.”
- Step 2: Go to “File” > “Library” > “Update Cloud Library.”
- Step 3: Wait for the update process to finish.
- Step 4: Navigate to the “Playlists” section.
- Step 5: Check if your playlists are now visible.
7. Rebuild Your Apple Music Library
Rebuilding your Apple Music library can be a helpful solution if playlists or songs are missing due to syncing issues, app glitches, or account errors. This process involves recreating your library to restore missing data and ensure everything is properly organized.
For Mac/Windows
- Step 1: Open iTunes or the Music app on your Windows PC or Mac.
- Step 2: Click on the “File” menu at the top.
- Step 3: Select “New” > “Smart Playlist.”
- Step 4: In the Smart Playlist window, set rules based on your preferences, such as genre, artist, or date.
- Step 5: Once you’ve set the criteria, click “OK.”
- Step 6: Name the Smart Playlist to reflect the criteria you’ve chosen.
- Step 7: Click “OK” to finalize the playlist creation.
8. Track Apple Music Library Changes
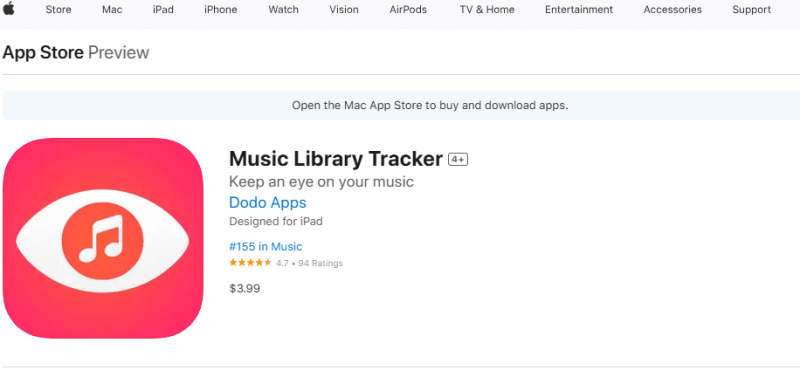
Tracking changes in your Apple Music library is essential to stay on top of any updates or modifications that might affect your playlists or music collection. Changes such as syncing errors, accidental deletions, or issues during updates can lead to missing playlists or songs. Regularly reviewing your library ensures you can identify and address these changes promptly.
For Mac/Windows
- Step 1: Open the App Store on your iPhone or iPad.
- Step 2: Use the search bar to look for “Music Library Tracker.”
- Step 3: Find the app in the results and tap on it to view its details.
- Step 4: Purchase the app for $3.99.
- Step 5: Download and install the app on your device.
Part 3. How to Prevent Apple Music Playlist Gone After Subscription
Backing up your Apple Music playlists ensures you’ll always have access to your favourite songs, even if issues like expired subscriptions, syncing errors, or unexpected glitches occur. While Apple Music doesn’t offer a built-in option to save playlists permanently, UltConv Music Converter make it easy to preserve your playlists.

- Save songs, albums, and playlists from Apple Music to MP3.
- Remove DRM from Apple Music without any limitations.
- Save Apple Music with the original quality and ID3 tags.
- Convert Apple Music to 10+ widely-used audio formats.
- Support to convert audio from 10,000+ platforms, like Apple Music, Spotify, Amazon Music, SoundCloud, etc.
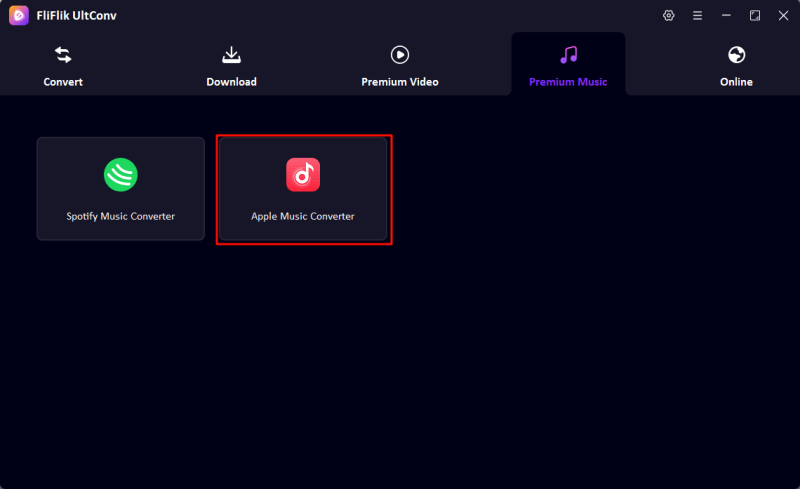
Open UltConv Music Converter and turn on Apple Music Converter in Premium Music.
![ultconv apple music converter]()
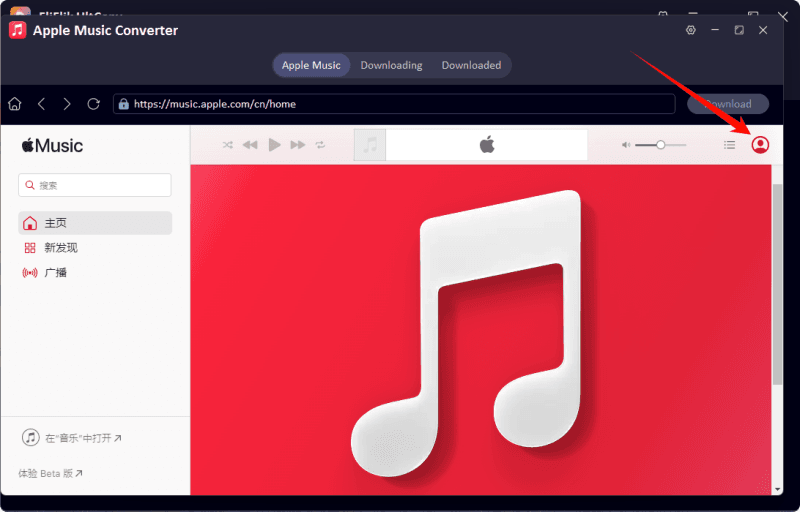
Then, log in with your Apple ID to access your Apple Music Account.
![login to apple music in ultconv]()
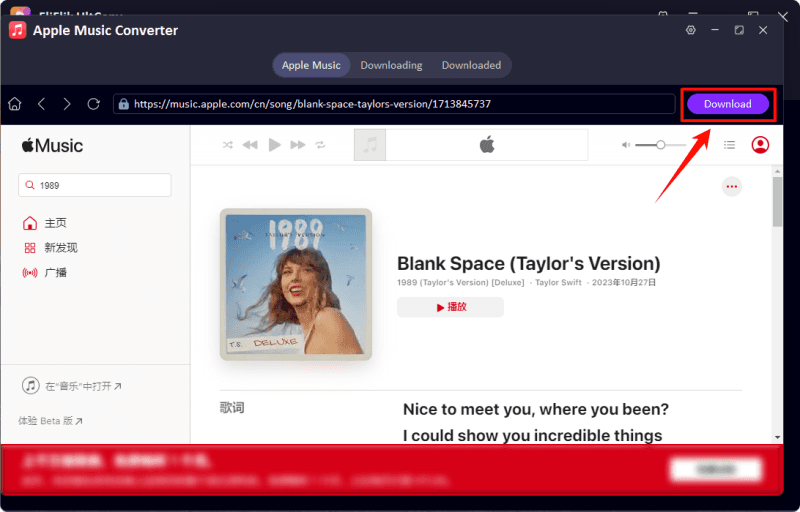
Browse your Apple Music library and select the songs or playlists to convert. Click the Download button to begin the conversion process.
![download apple music to mp3]()
Conclusion
Losing your Apple Music playlists can be frustrating, but with the right steps, they can often be restored quickly. By identifying the cause you can apply targeted solutions. For long-term security, consider backing up your playlists with FliFlik UltConv, ensuring you retain access regardless of technical hiccups. With these methods, you can fix the Apple Music playlist gone issue.

