

 By
By  9 minutes read
High-quality photos and HD screenshots on a Mac take up a lot of space. Not only do they pile up quickly and fill up your hard drive, but they also often cause upload failures when you try to post them online, send them via email, or share them on social media because they exceed file size limits.
The good news is that you don’t need to install any additional software. macOS’s built-in Preview, Quick Actions, and Photos apps can easily handle compression, allowing you to quickly compress an image on mac while preserving image clarity as much as possible—achieving efficient, hassle-free, lossless file optimization.

- Part 1. How to Compress Images on Mac Using Preview APP
- Part 2. How to Compress Images on Mac Using Quick Actions
- Part 3. How to Compress Images on Mac Using Photos App
- Part 4. How to Compress Images on Mac Using Online Tools?
- Bonus Tip. Best Free Video Compressor on Windows & Mac
- FAQs
- Conclusion
Content Table:
Part 1. How to Compress Images on Mac Using Preview APP
Preview is the default image viewer on macOS, but many users don’t realize it also works as a simple image compression tool. It allows you to reduce image file size by changing the format and adjusting the quality level. This method is quick, free, and does not require installing any extra software, making it one of the easiest ways to compress images on a Mac.
▼ Steps to Compress Images on Mac with Preview
- Step 1: Open the image you want to compress in the Preview app. On most Macs, Preview opens automatically when you double-click an image file.
- Step 2: Click File in the top menu bar, then select Export from the dropdown menu.
-
Step 3:
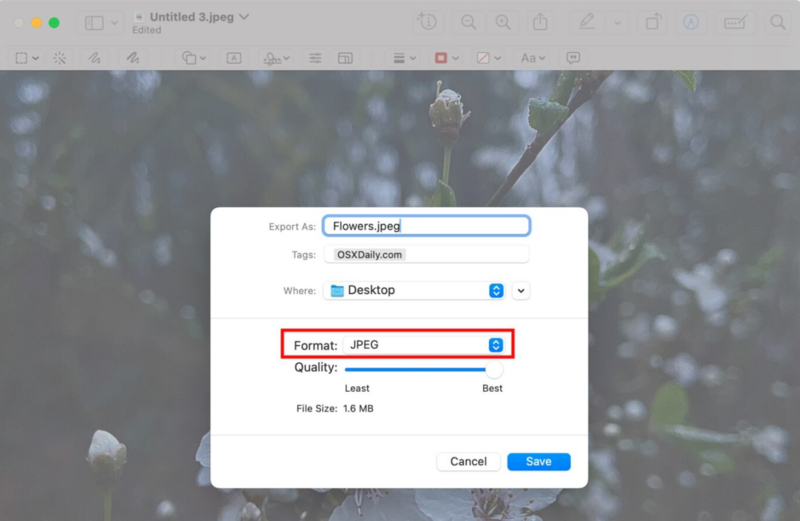
In the export window, change the image format to
JPEG
for better compression results.
-
Step 4:
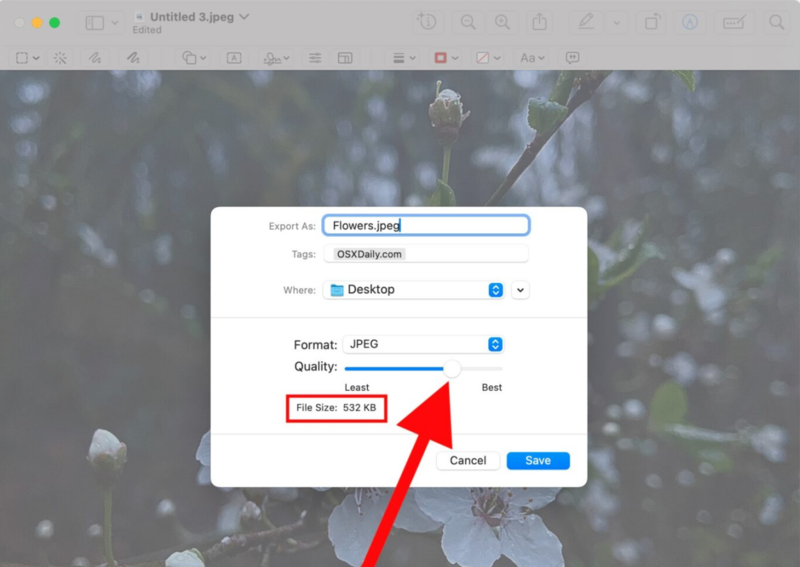
Adjust the
Quality
slider to reduce the file size. A quality range between 75% and 90% usually keeps the image looking clear while significantly lowering the file size.
- Step 5: Choose where you want to save the compressed image, then click Save to finish the process.


Part 2. How to Compress Images on Mac Using Quick Actions
Quick Actions is another built-in macOS feature that lets you quickly convert and compress images directly from Finder. It’s one of the fastest methods because you don’t even need to open another app. This feature is especially useful when you want to compress multiple images at the same time.
▼ Steps to Compress Images on Mac with Quick Actions
- Step 1: Open Finder and locate the image you want to compress.
-
Step 2:
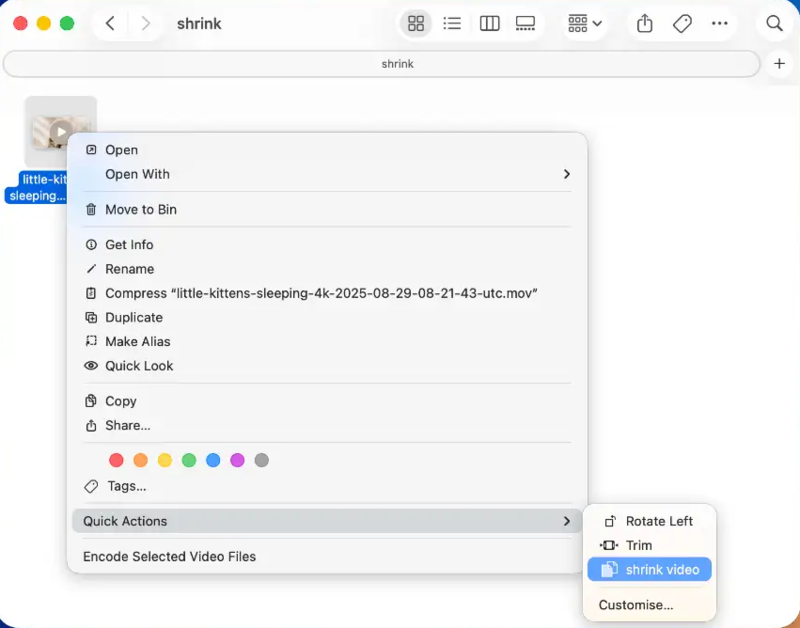
Right-click the image, then choose
Quick Actions > Convert Image
from the menu.
- Step 3: In the pop-up window, select JPEG as the format if it is not already selected. JPEG usually provides smaller file sizes while keeping good image quality.
- Step 4: Click Convert to JPEG to start compressing the image. The new compressed file will automatically be saved in the same folder as the original image.
- Step 5: If needed, you can repeat the same process for multiple images at once using batch processing.

Part 3. How to Compress Images on Mac Using Photos App
The Photos app on macOS also allows users to reduce image size while exporting pictures. This method is helpful if your photos are already stored in the Photos library and you want to quickly export them in a smaller size or lower quality for sharing, uploading, or saving storage space.
▼ Steps to Compress Images on Mac with Photos App
- Step 1: Open the Photos app on your Mac and select the image or images you want to compress.
- Step 2: Click File from the top menu bar, then choose Export and select Export Photo or Export X Photos depending on the number of images selected.
-
Step 3:
In the export settings window, choose the image quality and size you want. You can select options like Small, Medium, Large, or customize the dimensions manually.
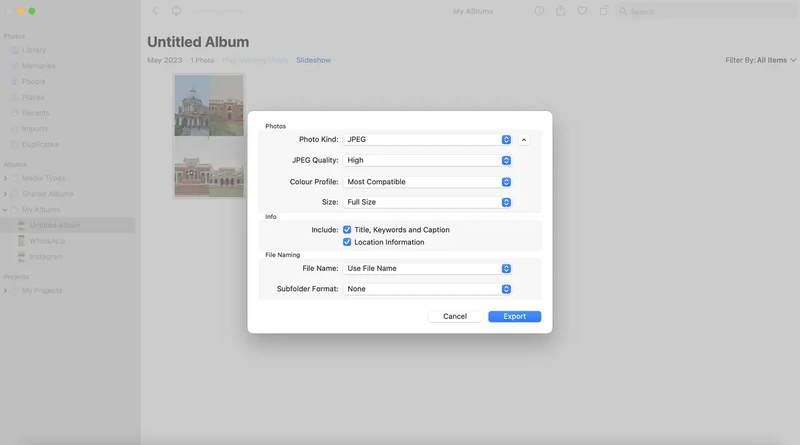
- Step 4: Select the desired image format such as JPEG, then click Export to save the compressed image files to your Mac. While the Photos app works well for simple compression, it may not be the best option for advanced control or large batch processing tasks.

Part 4. How to Compress Images on Mac Using Online Tools?
If you don’t want to install software or use built-in Mac apps, online image compressors are another easy option. Below are 2 best options to try.
1. iLoveIMG

iLoveIMG is a popular online image compressor that supports formats like JPG, PNG, GIF, and WebP. The platform is simple to use, just upload your images, compress them, and download the smaller files within seconds. It also supports batch compression, making it useful for users handling multiple images at once.
- Simple and beginner-friendly interface
- Supports batch image compression
- Works directly in the browser without installation
- Requires internet connection
2. Squoosh

Squoosh is a free image compression tool developed by Google engineers. It gives users more control over image quality, dimensions, and compression settings compared to many basic online tools. One useful feature is the side-by-side preview that lets you compare the original and compressed image before downloading.
- Advanced compression settings and quality control
- Real-time preview before downloading
- Supports modern formats like WebP and AVIF
- Interface may feel complex for beginners
- Large images can take longer to process on slower devices
Bonus Tip. Best Free Video Compressor on Windows & Mac
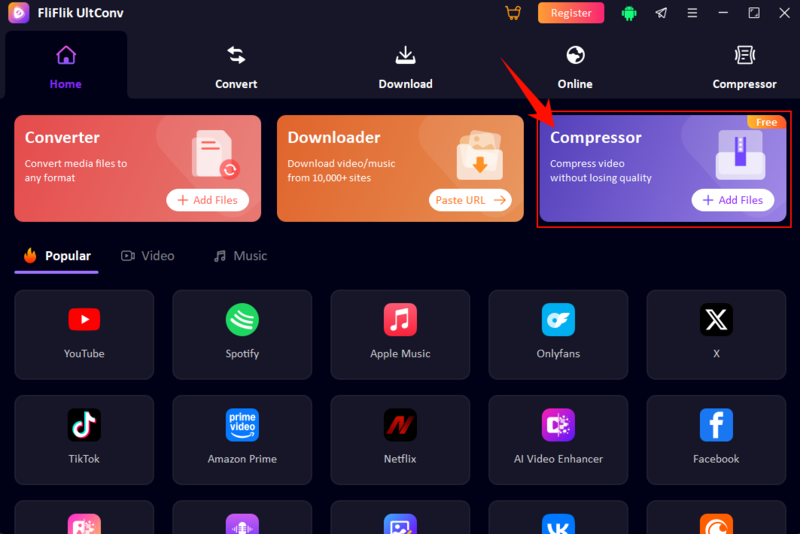
While online compressors exist, they frequently frustrate users with strict file size limits, annoying watermarks, and slow processing speeds that crawl when handling high-quality content. FliFlik UltConv Video Compressor offers a superior, professional-grade solution for both Windows and Mac.
As a free desktop tool, it breaks through the limitations of browser-based converters by offering unlimited compression across 100+ media formats, including MP4, MOV, MKV, and even high-fidelity audio like FLAC. Powered by hardware acceleration for 10x faster performance, it features batch processing and instant previews to ensure you get the perfect balance of size and quality every time.

- Compress videos and audio files in 100+ formats
- Batch compress multiple files at the same time
- Reduce 4K and 8K video sizes with minimal quality loss
- Preview compressed video quality before saving
- Adjust compression level with a flexible size and quality slider
▼ Steps to Compress Videos with FliFlik UltConv Video Compressor
-
Download, install, and launch FliFlik UltConv Video Compressor on your Windows or Mac computer.
FREE DOWNLOAD![secure download]() Secure Download
FREE DOWNLOAD
Secure Download
FREE DOWNLOAD![secure download]() Secure Download
Secure Download
-
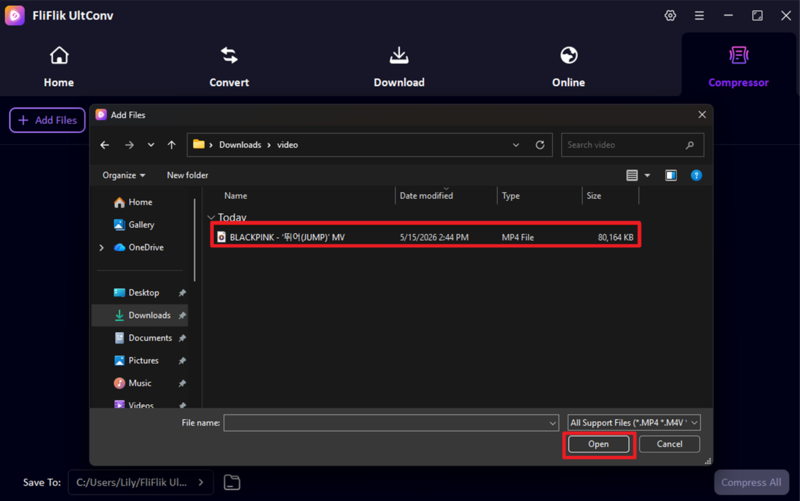
Drag and drop your video files into the program interface. The software supports popular formats like MP4, MOV, AVI, MKV, and more.
-
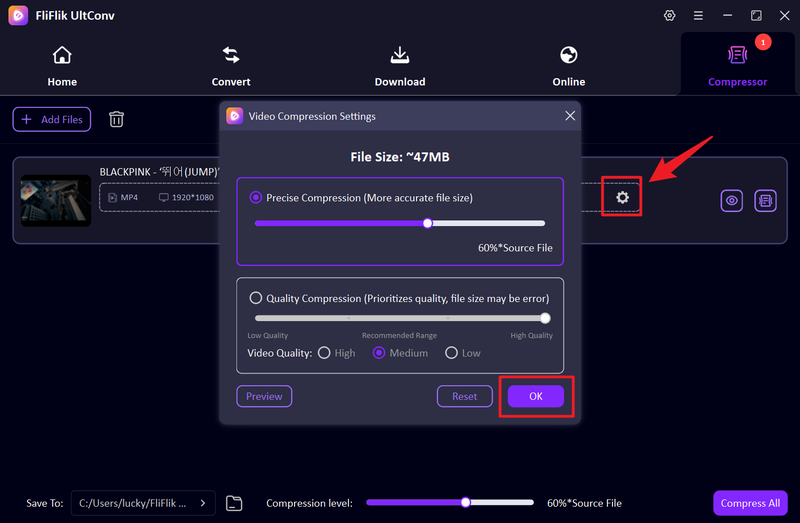
Click the Gear icon to open the compression settings panel. Adjust the compression level, file size, or video quality based on your needs.
-
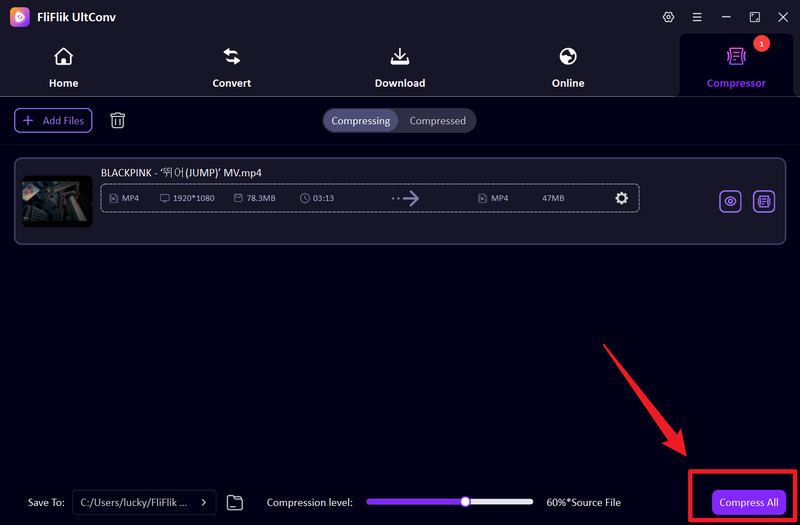
After customizing the settings, click Compress All to begin compressing all queued videos at high speed.
-
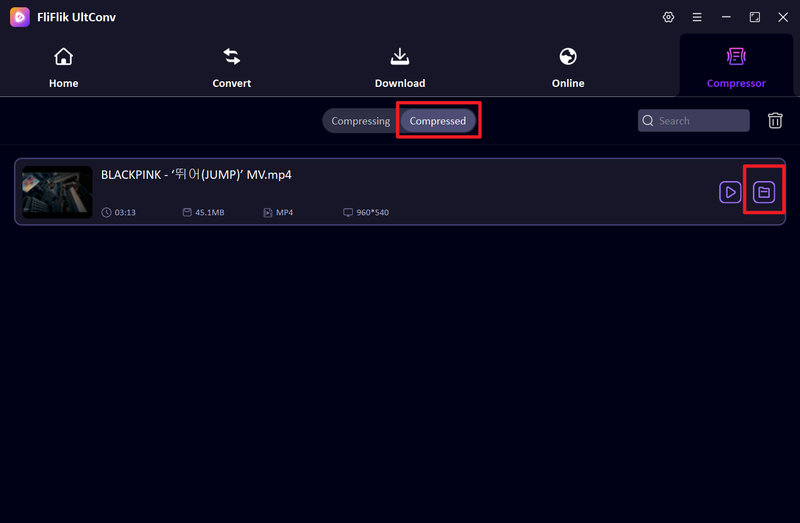
Once the process is complete, go to the Compressed tab to find your finished files. You can use the Play icon to preview the video quality before sharing or saving it.


FAQs
Q1. What is the best Mac photo compressor?
The best Mac photo compressor depends on your needs. Use Preview or Photos for quick, no-install tasks. For advanced features like batch processing and better quality control, online tools like iLoveIMG or Squoosh are excellent alternatives.
Q2. How to compress JPEG format on Mac?
You can compress JPEG images on a Mac using the Preview app. Simply open the image in Preview, clickFile > Export, chooseJPEGas the format, and lower the quality slider to reduce the file size.
Conclusion
Compressing images on Mac is easier than you think. Using built-in tools like Preview, Quick Actions, and Photos—or even online compressors—allows you to quickly reduce file sizes without sacrificing quality. These simple methods save storage space and ensure your images are ready for fast uploads and easy sharing.
For large video files, especially 4K or 8K content, FliFlik UltConv Video Compressor is a powerful solution for both Mac and Windows. It supports over 100 formats and features batch processing with fast speeds, providing a professional yet simple way to manage and shrink your high-resolution media.
 Secure Download
Secure Download
Secure Download